Classic Airframes 1/48 Hawk III TRASHED

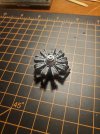
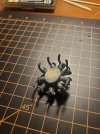
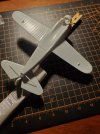
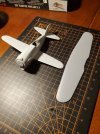
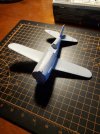
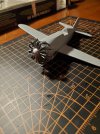
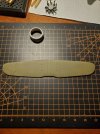
I finished with the engine. Painted the hub aluminum. The cylinders have a base of gunmetal topped with dark gull gray and then a black wash. Exhaust pipes were painted flat black then brushed with Tamiya rust powder. After that I attached the lower wings. Next step will be to fill a few more gaps and then hit it with primer to see where it stands before paint.
 

Attachments

  • 20230917_211111.jpg
    20230917_211111.jpg
    290.1 KB · Views: 11
  • 20230917_211123.jpg
    20230917_211123.jpg
    281 KB · Views: 11
  • 20230917_221341.jpg
    20230917_221341.jpg
    249.1 KB · Views: 11
Upper wing is together, cleaned up and primed. Fuselage assembly had final filling done and is ready for primer. Slowly but surely it is coming together.
 

Attachments

  • 20230920_214234.jpg
    20230920_214234.jpg
    342.9 KB · Views: 9
The fuselage assembly is in primer now. A little bit of smoothing in a couple spots and it will be ready for paint. Rather excited now. I am starting to see the light at the end of the tunnel on this kit.
 

Attachments

  • 20230921_184930.jpg
    20230921_184930.jpg
    292.5 KB · Views: 5
  • 20230921_184939.jpg
    20230921_184939.jpg
    274.6 KB · Views: 5
Final bit tonight was test fitting the engine and cowl. As you can see the engine is on nicely with exhaust routed well. However..... the cowl that goes around the engine is too small.... by a lot. So, I have to get that fixed. I already glued styrene rod to the ends of one cowl half and will need to trim, shape and smooth it out. It's an adventure!
 

Attachments

  • 20230921_222139.jpg
    20230921_222139.jpg
    289.1 KB · Views: 9
Final bit tonight was test fitting the engine and cowl. As you can see the engine is on nicely with exhaust routed well. However..... the cowl that goes around the engine is too small.... by a lot. So, I have to get that fixed. I already glued styrene rod to the ends of one cowl half and will need to trim, shape and smooth it out. It's an adventure!
That is looking really good.
I had the same issue with the cowl on the Staggerwing. I attempted to modify but elected to just leave it off.
1695354164273.jpeg
 
I finally got some paint on the upper wing. A few weeks back I bought a cordless airbrush to try out and it works pretty well. I am still learning to work with it but it did work okay on the first coat on the wing. I also have the engine cowl sized right but still need to finish smoothing it out.
 

Attachments

  • 20230923_212848.jpg
    20230923_212848.jpg
    312.6 KB · Views: 8
It definitely requires a lot of patience to do. That's why I have had to take a couple breaks from it. It is quite tedious and time-consuming and starts to become more of a chore. Now that I'm getting close to finishing it I am getting a bit more excited about it.
 
It has paint! I also attached the tail wheel and drop tank and am now working on the landing gear. I will finish off the top wing then and start attaching rigging. I'm saving mounting the engine and cowl for last.

20231029_192648.jpg

20231029_192706.jpg
 
This thing almost went in the trash last night. Trying to get the landing gear on is an ordeal. The landing gear is made of soft metal. Very soft metal. The main struts were bent every way but straight. I finally got most of the landing gear together but stopped for the night before I smashed the dang kit and trashed it. Very aggravating!
 
Almost done with the upper wing, just a couple more rigging lines to attach. On the closeup pic, that bottom pad to mount the N strut is badly molded and the "hole" is in the wrong place. This has been normal for this kit. It is a fight every step of the way. Also, be gentle with the rigging critiques, it is my first time trying to rig a biplane...lol

20231105_080619.jpg

20231105_080635.jpg

20231105_080644.jpg
 
I have tried and tried and tried some more on this thing and I just can't continue with it. The white metal landing gear struts are so soft they won't support the weight of the kit without splaying out. That is the last straw for me. I know now that Classic Airframe kits are for people that are good at scratch building as that is the only way it can be assembled. I am throwing away this as the aggravation is just too much.
 
I have tried and tried and tried some more on this thing and I just can't continue with it. The white metal landing gear struts are so soft they won't support the weight of the kit without splaying out. That is the last straw for me. I know now that Classic Airframe kits are for people that are good at scratch building as that is the only way it can be assembled. I am throwing away this as the aggravation is just too much.
I’ve been there brother. It’s aggravating to get so far on a kit then end up trashing it.
The next kit will be redemption.
 

Latest posts

Back
Top