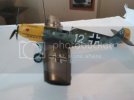
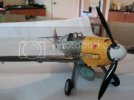
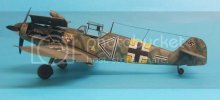
BF109- Help !!

rookie

This is not a toy
Joined
May 18, 2012
Messages
937
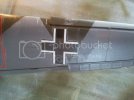
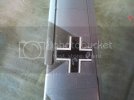
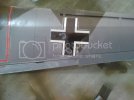
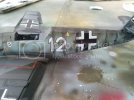
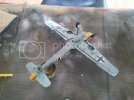
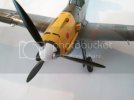
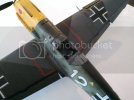
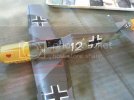
Just applied a coat of Future over my decals and got these wierd water spot marks...arrrrgh. Used Tamiya declas with microset & microsol. The "Future" I used was the Australian version ( Pascoes Long Life ), but from what I have read is very similar to the US/Euro product.
I have used it before and not had this problem......

Any one had this happen before ? If so are there any remedies? or is this one a write off.... ??? ???

Any advice would be appreciated

cheers
2012-06-01163904.jpg
2012-06-01163800.jpg
2012-06-01160120.jpg
2012-06-01155956.jpg
 
rook it looks almost like a water mark. Try using a dampened paper towel and dab the spots gently to see if they wipe off. You have a spot there on the leading edge of the wing so practice on that first since there is no decal there. The other thing that may actually work out fine is your final clear coat. That may "fade away" the water marks when applied and remedy the problem. I think this happens with Future if it has been sitting around a while in the bottle. Try a mixture of diluted Future with water next time to thin it out. Lastly you could always purchase new decals and start from scratch. Not the option you want to hear but it's always on the table. She's coming out great though....stick with it, it'll all come together and be fine.
 
To me it looks like the future has been applied a bit too heavy ,and the spots look like possibly drips from your AB which have been left to dry . I have been told that Windex takes future of without harming the paint ,but I havent tried it myself ,and Im not sure if it would affect the decals . You could try damping a brush with it and try on the leading edge first .You've nothing to lose ,if you cant get it of then its going to be new decal anyway !.

Chris.
 
I think Chris is correct. ISO alcohol works too just don't flood the decal or it may break up. Oh and don't use it on acrylics thinned with ISO.


BTW - I despise Tamiya decals. They are just way too thick and the film never seems to go away unless you put 20 coats of Microsol on them.
 
Thanks guys, will try both. Worst comes to worst Ican use the alternate set of decals that came with the kit.

whats the best way to revmove the old decals ? Just hit them with microsol and rub them off ?

Will let everything dry out overnight and see if there is any change, was realy heartbreaking as I was so happy with the progress so far, but hey thats modeling right ?

Keep you posted
 
Agree with the comment re Tamiya decals, my other 2 builds have been Academy and the kit decals went on superbly.
 
Well the thin coat of Future seemed to do the trick, tried windex and water with a Q tip but wouldnt budge.
Thanks for the tips guys, just some weathering and final pieces to add and she'll be done.
I'll post some pics when shes finished.

cheers :)
 
Were the decals completely dry before you over-coated them? It might have been a reaction between the setting solutions and the clear coat.
 
Hi Spitfire, Yes the decals had been applied about 2 weeks ago, I think thats what it was- a reaction to the setting solution.
 
Re: BF109- Nearly done


After the drama with the decals made some more progress today. Washed with oils before I attached the drop tank and landing gear. One day I'll buy a proper cutting mat...
2012-06-04111921.jpg
2012-06-04111948.jpg

Landing gear and tank
2012-06-04130430.jpg

Attached some of the glass, I want to display with canopy open so will leave that to the very end. Also got the wing guns on, these will still need to be brush painted. Calling it a day, hope to finish up next weekend will need to place the antenna and wire ( should be interesting havent tried it before ).

2012-06-04154636.jpg
2012-06-04154703.jpg
2012-06-04154726.jpg
2012-06-04154749.jpg

I'm not sure if I'm happy with the weathering, I would like to show some more modulation especialy around the fabric wing flap areas....just not quite sure how I'm gonna do it !

Any comments and suggestions would be appreciated
 
She's coming along nicely. Prop looks clean if that's what you mean by needing a bit more weathering. Otherwise she's sweet.
 
the prop does look a little shiny in the pics, will probably add on some chipping effect with a silver Gundam pen. I'm pretty sure these birds had metal props ?
 
Sweet recovery!

As for the shiny prop, I don't think adding a "rusting" effect would solve the shiny problem. Now I'm not history buff, but perhaps the prop is supposed to be matte?
 
Prop doesnt look that shiny in real life , i think its just the light playing off it in the pics. I was talking more about adding some chips along the leading edges in silver
 
I can see the light at the end of the tunnel on this one, but cant get the ariel wire right.... Have tried heating up a piece of sprue and stretching out with frustrating results. Its either not long enough or inconsistent in width or just plain snaps before it gets to the required length. Running out of spare sprue!

I''ve read eveyhing from fishing line to guitar string or even using a piece of my wifes hair.

Anyone got any fool proof ways to nail this so I can put this one to bed ???? I've thought about leaving it off alltogether, but I think the wire is realy the icing on the cake.

Look forward to your learned replies :)
 
Hi Rookie,

To be honest I only use stretched sprue ...keep buying kits you wont run out ;D Anyway ,how I do it is ....leave the length longer than needed . Attach one end using CA ( superglue) this wont melt the plastic . When its dry use snips to cut to the required length ,dont worry about it being slightly too long ,then fix that end in place (again using Superglue ) Once its all dry ,heat up an old blade /pin or similar ,now hold the heated blade close to the wire ,but not touching and run it up and down the length of the wire ,this will shrink it and tension it .Might take a little practice ,but it does work .........

DSCF4977.jpg

Chris.
 
Good advice from Chris above.

I had trouble streching sprue before also. It takes some practice, here's what I've found;

To soften/melt the sprue I roll it above a candle so that it gets evenly heated. I start with it quite a distance from the candles flame so I don't burn it. Slowly move it closer to the flame as required. Continue to roll the sprue above the heat source until it melts enough that it bends or (for want of a better word) gets "limp". :-[ Nows it's ready to be streched. Pull the two ends apart at a constant speed. With practice you can vary the thickness with speed.

Another option for antenna wire, is to visit a local fishing supply store. I often use a product called "Spider Thread". I like it because it is kind of "stretchy", takes paint not to bad, and really adheres well with CA. Great stuff if you can find it.

http://ecx.images-amazon.com/images/I/31NDEF39QKL._SL500_AA300_.jpg[img]

Nylon thread can also be used. Tighten it up with a hot blade the same way Chris describes above.

Hope this helps.
 
Thanks guys, will give it another crack today and hopefully have some pics posted of the finished product tomorrow...fingers crossed
 

Latest posts

Back
Top