1/48 Slovakian MiG-29 "Digital Thunder"

JediPuju

New Member
Joined
Jun 9, 2009
Messages
47
Ok folks - my entry into the Spring contest.
Going to be tough for me this one, especially since It usually takes me aeons to complete a model!

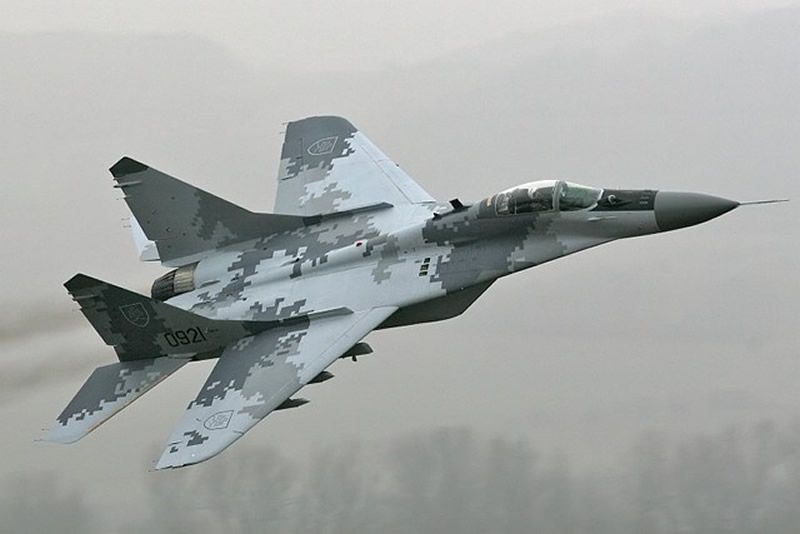
Ive been in love with the MiG-29 for ages - I think the Fulcrum and its larger cousin the Su-27 are among the most striking looking birds in existence. This particular example wowed crowds with its digital camouflage - which looks super cool, in my opinion ;D

First the obligatory shot with date:

SSL24573.jpg

Hope this shows everything is in order!

And the start of the goodies:
Wolf-Pack's new release just for this kit apparently.

SSL24563.jpg

Arrived just today so gonna put all my other builds on hold for this one!!

Gonna be off in a minute to order the Ares burner cans as well.

I prefer to do my models in flight - so hopefully Ill be able to find a pilot to go in this. :-\

Wish me luck!
 
Very nice choice!!! The Digital camo is sweet too! Looking forward to watching your progress!
 
Awesome. Good choice with the resin AM parts. Wolfpack is quality too.
Are you going to do the digital camo? Always wanted to try that myself.

Good luck mate!!
 
Good luck looking for a pilot I didnot find one for my mig if you find please let me know .

good model to do I like migs.
 
Hi All,

Sorry bout the slow replies Ok: mega update

DreamKnight said:
You going with the digital Camo there Jedi?

Too right mate. Therein lies a problem however. In the box, you will find these:

IMAG0149.jpg

Initially, I was thinking "these look fraking awesome!" But then looking at reference photos such as:

AIR_MiG-29_Slovakian_Digital_Thunder_Camo_lg.jpg


You can see that colour-wise , academy have really messed this up. :'( Its a real, real shame because they are printed by cartograf and are rather nice.

So - what to do? Ive been thinking several options. Ive scanned the sheet of decals into photoshop and because of the square patterns its rather easy to do some retouching work on them. My problem is i dont have an alps printer to reprint them. Ive done decals before with a colour laser printer, but I will have problems with the lighter colurs. Anyone have an alps printer? nudge nudge wink wink eh? say no mowah!

Otherwise, my plan is to use these scanned decals to print masks. I can print out the patterns and transfer them to masking tape. There isnt actually that many patterns so It might not be too labourious.
The only thing Ill still need to print is more national insignia, which as they are a light colour , I might still need an alps printer. There are several on the sheet, I havent counted yet so my only hope is that academy have provided enough should you want to paint the camo - but I doubt it.

mademodeller said:
Good luck looking for a pilot I didnot find one for my mig if you find please let me know .

good model to do I like migs.

Indeed - not sure what to do about this, I will probably end up hacking up something from another kit, like I did with the harrier.
And I agree - I pretty much like all the russian gear!

So meanwhile, progress update:

Got rid of the large step inside the intakes:

CopyofSSL24574.jpg

Got the forward sections of the fuselage halves together, trying to eliminate as much as possible any steps in the join. Some filling and sanding are still going to be required here:

SSL24576.jpg

This seam is going to be a right git:

SSL24577.jpg

shes gonna be a nice model me hopes!

CopyofSSL24575.jpg

Ive done more - will post again when Ive upped my photos.
 
Looks like your progressing. Those seam will be a challenge, but I think you can handle it
 
Wicked Pissah on those decals dood!

I've seen people have good success with masking films and just plain ole masking tape. You could get some that is custom sized to those squares. That's the route I was going to go when I give it a go.

I like this stuff.

http://www.jammydog.com/
 
Nice progress! ;D I remember seeing the mask for sale somewhere....must be getting old! :p Can't remember where. I like your idea of transferring to make your own masks. Keep up the great work! ;D
 
I think that Rocketsilo has an alps printer, but I can't speak for him on if he will print them out for you.
 
JediPuju said:
So - what to do? Ive been thinking several options. Ive scanned the sheet of decals into photoshop and because of the square patterns its rather easy to do some retouching work on them. My problem is i dont have an alps printer to reprint them. Ive done decals before with a colour laser printer, but I will have problems with the lighter colurs. Anyone have an alps printer? nudge nudge wink wink eh? say no mowah!

Hmmm, yeh those decals really bite. I've seen a few people just mask and paint in the pattern. It comes out really nice but it's some tedious and patient work you'll have to do there.
 
I think I like DKs idea of painting them on. I'd try using the kit decals as a template and placing them under a sheet of frisket film. Then carefully cut our either a postive or negitive mask using a very sharp #11 blade and straight edge. Just you have to be careful not to apply to much pressure as you cut.
 
JMac said:
I think I like DKs idea of painting them on. I'd try using the kit decals as a template and placing them under a sheet of frisket film. Then carefully cut our either a postive or negitive mask using a very sharp #11 blade and straight edge. Just you have to be careful not to apply to much pressure as you cut.

I second this idea, if you have never worked with frisket film it is worth picking up for things like this.
 
First off folks - sorry for the lack of updates. Progress is slow I totally lost the will to make models for about a month which seems odd since the compo should have spurred me on. I guess you never know when you are going to loose the "mojo" but Im back so even if I miss the deadline, Im still gonna finish this one. I think Im gonna have to hit the scifi next as I think ive been too into the military stuff lately. Anyway:

I got a few more goodies, some PE and the quickboost radome. This was a good mil or so larger in diameter than the kit nose, so I glued a couple of small nuts together and threaded a screw through them. I glued this to the end of the nose and used this to expand the nose vertically after cutting away some material. then I put in some cocktail stick braces sideways to get some extra width. The fit was much better, but I still needed to sand quite a bit to get it flush. I then filled the nose with epoxy.
The plastic on this kit is very soft, and when I was using the screw the side ripped !! I had to patch it up as you can see below. I also cut out and reshaped the gun vent as you can see here, Im going to make a new one later as the real one is raised out slightly from the surface.

IMG_20110607_014900.jpg

Also, Ive done a lot of work closing the gear doors. This was a tedious process and still needs lots of cleanup, but its not looking bad!

IMG_20110607_014921.jpg

Got some PE into the ventral intake areas, which still needs some cleaning:

IMG_20110607_014844.jpg

And check this, found me a pilot:

IMG_20110607_015259-Copy.jpg

Office nearly done:

IMG_20110614_234130.jpg

And I think hes gonna work out just fine! :

IMG_20110614_233918.jpg

Grendels said:
JMac said:
I think I like DKs idea of painting them on. I'd try using the kit decals as a template and placing them under a sheet of frisket film. Then carefully cut our either a postive or negitive mask using a very sharp #11 blade and straight edge. Just you have to be careful not to apply to much pressure as you cut.

I second this idea, if you have never worked with frisket film it is worth picking up for things like this.

Yup - I agree as such Ive already been working on creating the masks in photoshop.
Ive scanned the decals in and working on it. once the cockpit's in I should be in a position to start speeding the build up a bit. Im looking forward to painting this one. :D
 
Nice looking office you got there and the jockey to go inside! Glad to see the mojo came back!!! Keep it rolling!! 8)
 

Latest posts

Back
Top