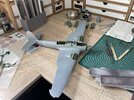
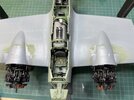
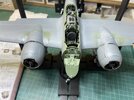
Zoukei Mura 1/32 Ki 45Toryu (Nick)
- Thread starter BarryW
- Start date
Amazing build! The detail and paintwork on this Zoukei-Mura 1/32 Ki-45 Toryu are truly impressive. I love how the weathering brings out the character of the aircraft. Thanks so much for sharing your work — it's very inspiring for fellow modelers like me!
BarryW
Well-Known Member
- Joined
- Apr 17, 2025
- Messages
- 112
Japanese WW2 colours are a minefield. MRP have a pretty well researched range of them in lacquers four different cockpit shades included, plus two Aotake shades. Working out the right colours for individual subjects though is not easy as among the information needed is which factory built the aircraft.Looking great.
That green has 'authentic' written all over it, not that I'd know, but it sure looks that way!
BarryW
Well-Known Member
- Joined
- Apr 17, 2025
- Messages
- 112
Edbert
Well-Known Member
- Joined
- May 16, 2024
- Messages
- 1,642
in my limited experience with IJA/IJN subject matters, this is an understatement!Japanese WW2 colours are a minefield.
The good news for modelers is, it sort of eliminates the "that is not the right shade of green" arguments.
Edbert
Well-Known Member
- Joined
- May 16, 2024
- Messages
- 1,642
Love it!
I do not want to read too much into your pics Barry, but I think your last two posts illustrate what I think (I've only built 2 kits from ZM so not enough data) is a major flaw with their designs.
In the earlier pic you have fitted the engines, and used rather beefy clamps to hold them in place. Only to find that when applying the cowls they do not mate up with other sheet-metal parts. On my only ZM radial build I had that problem. I surmises that my engine was not mounted exactly correctly, or that the braces the engine bolts to was not exactly right. But in those stages there's no way to know, until you try to fit the covers, which cannot be done via dry-fitting if you are holding 8-10 bits by hand.
Similar but different issue with my inline water-cooled build but this time it was the wing-roots and their covers that did not mate up exactly. Nothing that cannot be fixed as you said, but took a little of the shine off the kit for me. Not sure what I'd say they should do to fix it, maybe offer some blueprints with double-decimal measurements so the builder can be sure not to encounter problems later?
BarryW
Well-Known Member
- Joined
- Apr 17, 2025
- Messages
- 112
ZM have very tight tolerances and it takes very little to have something not quite in the right position to give this problem. It could be as little as the thickness of the paint.Love it!
I do not want to read too much into your pics Barry, but I think your last two posts illustrate what I think (I've only built 2 kits from ZM so not enough data) is a major flaw with their designs.
In the earlier pic you have fitted the engines, and used rather beefy clamps to hold them in place. Only to find that when applying the cowls they do not mate up with other sheet-metal parts. On my only ZM radial build I had that problem. I surmises that my engine was not mounted exactly correctly, or that the braces the engine bolts to was not exactly right. But in those stages there's no way to know, until you try to fit the covers, which cannot be done via dry-fitting if you are holding 8-10 bits by hand.
Similar but different issue with my inline water-cooled build but this time it was the wing-roots and their covers that did not mate up exactly. Nothing that cannot be fixed as you said, but took a little of the shine off the kit for me. Not sure what I'd say they should do to fix it, maybe offer some blueprints with double-decimal measurements so the builder can be sure not to encounter problems later?
I am pleased that I got this far without any kind of significant issue.
BarryW
Well-Known Member
- Joined
- Apr 17, 2025
- Messages
- 112
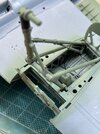
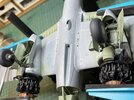
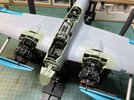
Slow gong at the moment. Doing various 'odd jobs'. Some pictures of a few
Some more work to the u/c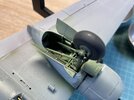
The nose guns and landing light fixed into place.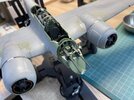
I used AK metallic pens for the chrome.
I used a brass rod to replace the broken gin barrel.
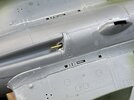
It won't be long before I start the painting. It's going to be a challenge.
Some more work to the u/c

The nose guns and landing light fixed into place.

I used AK metallic pens for the chrome.
I used a brass rod to replace the broken gin barrel.

It won't be long before I start the painting. It's going to be a challenge.
- Joined
- Sep 4, 2022
- Messages
- 2,503
'Tis the season, on and off the bench. Glad you found some time to post progress. Looking forward to your paint treatment!Doing various 'odd jobs
BOATMAN
Well-Known Member
- Joined
- Oct 7, 2024
- Messages
- 971
HI Barry love your work on this plane an that gun barrel will look real very well done sir an ive been followin along on your buildSlow gong at the moment. Doing various 'odd jobs'. Some pictures of a few
Some more work to the u/c View attachment 151458
The nose guns and landing light fixed into place. View attachment 151459
I used AK metallic pens for the chrome.
I used a brass rod to replace the broken gin barrel.
View attachment 151460
It won't be long before I start the painting. It's going to be a challenge.
chrisb
Edbert
Well-Known Member
- Joined
- May 16, 2024
- Messages
- 1,642
Oh no, don't break the Gin barrel!!
Just giving you crap, I hate Gin anyway, love the work you're doing.
I suspect ZM's instructions tell you, what is the small gadget on the under-wing near the starboard engine nacelle? I'm working on a Ki-61 and it has one of those doomahickeys too.
Just giving you crap, I hate Gin anyway, love the work you're doing.
I suspect ZM's instructions tell you, what is the small gadget on the under-wing near the starboard engine nacelle? I'm working on a Ki-61 and it has one of those doomahickeys too.
plastickjunkie
Active Member
- Joined
- May 27, 2010
- Messages
- 129
Good call using Evergreen on the knob detailing. I would have done the same. For all round ones thick wood glue works great too.For things like throttle levers there's a catch-22 though. The PE is too thin to have a "knob" on the end, I have seen it where the manufacturer wants a triple thick (double folded to sandwich the center) bit on the end but there's alignment issues and seams created by this method. Similar but different with the plastic ones, they nail the knob part, but the shaft of the lever is never thin enough, even in 1/32. What I do to get around these problems is use the PE for the lever and make by own knobs from evergreen.
View attachment 149226
You are doing a fantastic job with this great looking kit. I have the old Nichimo 1/48 kit in the stash that requires a TON of work.
BarryW
Well-Known Member
- Joined
- Apr 17, 2025
- Messages
- 112
They describe it as a 'fuel cooler' Edbert.Oh no, don't break the Gin barrel!!
Just giving you crap, I hate Gin anyway, love the work you're doing.
I suspect ZM's instructions tell you, what is the small gadget on the under-wing near the starboard engine nacelle? I'm working on a Ki-61 and it has one of those doomahickeys too.

