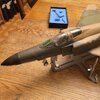
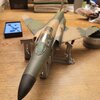
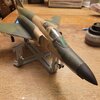
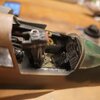
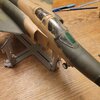
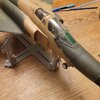
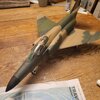
Next up....Vintage Revell F-4E circa 1975
- Thread starter lacrosse dad
- Start date
- Joined
- Dec 1, 2024
- Messages
- 313
Not bad for a first try? In my experience, freehand camo is a matter of practice, practice, practice. As I have not had enough practice, I use masks. For a soft edge, elevate the mask slightly.
- Joined
- Sep 4, 2022
- Messages
- 2,074
So the principles are the same as for airbrush illustration?For a soft edge, elevate the mask slightly.
Your comment reminded me of some trials I did in the 80s. French curves, friskets and masks...
Good on @lacrosse dad for jumping in! Not easy, but pretty good results.
- Joined
- Dec 1, 2024
- Messages
- 313
AFAIK, yes, though airbrush illustration requires real mastery of your airbrush system. I'm nowhere near.So the principles are the same as for airbrush illustration?
Your comment reminded me of some trials I did in the 80s. French curves, friskets and masks...
Good on @lacrosse dad for jumping in! Not easy, but pretty good results.
Edbert
Well-Known Member
- Joined
- May 16, 2024
- Messages
- 1,375
Marauder1981
New Member
- Joined
- Mar 15, 2024
- Messages
- 6
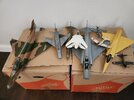
You are an inspiration. I have the exact same kit, built it as a teenager, was dissatisfied with it in college and started to retro it... but never finished the project. Fast forward, I'm nearing retirement. Rather than spend hundreds on new kits, I've started out by rehabbing old builds, long since boxed up and recovered from my folks' place after they passed away. The last year of do-overs has provided a lot of practice, bringing skills back up to somewhat average after 40 years away from the hobby - and introducing some new ones (e.g. air brushing, PE, resin parts, etc.). Your project has given me a lot of motivation for which I'm grateful. Thank you for sharing!

lacrosse dad
Well-Known Member
- Joined
- Oct 16, 2024
- Messages
- 127
Yep, I see two you have are exactly the model I'm working on now.....gotta say it was engineered to work right from the box and resistant to taking any aftermarket parts honestly. Hopefully, at the end I will have something to be proud of.....should be a couple of days out finishing the project. Keep at those vintage models, it has really been fun and stress relieving ( when things work out ) for me. THANKS for following the buildYou are an inspiration. I have the exact same kit, built it as a teenager, was dissatisfied with it in college and started to retro it... but never finished the project. Fast forward, I'm nearing retirement. Rather than spend hundreds on new kits, I've started out by rehabbing old builds, long since boxed up and recovered from my folks' place after they passed away. The last year of do-overs has provided a lot of practice, bringing skills back up to somewhat average after 40 years away from the hobby - and introducing some new ones (e.g. air brushing, PE, resin parts, etc.). Your project has given me a lot of motivation for which I'm grateful. Thank you for sharing!
View attachment 146592
- Joined
- Sep 4, 2022
- Messages
- 2,074
@lacrosse dad , maybe something you'll want to look into for freehand work.airbrush illustration
Found one of those friskets from the 1980s... nope, I rarely throw anything away if it might be useful again one day!
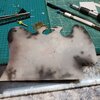
This is just masking film folded onto itself (for rigidity), with some shaped cuts for the drawing I was working on.
- Joined
- Dec 1, 2024
- Messages
- 313
Cool idea!
lacrosse dad
Well-Known Member
- Joined
- Oct 16, 2024
- Messages
- 127
- Joined
- Sep 4, 2022
- Messages
- 2,074
...most of that goes with the territory... reading about others' adventures, I don't know that there is any point where we can be completely happy with our work, unless of course, you want to be.
And yes, I'm sitting on the sidelines, and haven't touched an airplane model in 50 years, but I quite like the stuff you've been posting for us.
Cheers!
And yes, I'm sitting on the sidelines, and haven't touched an airplane model in 50 years, but I quite like the stuff you've been posting for us.
Cheers!
- Joined
- Dec 1, 2024
- Messages
- 313
"Adding too many parts without letting each one dry and set."
What solvent cement are you using? Most of the ones I've tried are pretty "fast."
What solvent cement are you using? Most of the ones I've tried are pretty "fast."
lacrosse dad
Well-Known Member
- Joined
- Oct 16, 2024
- Messages
- 127
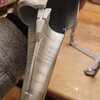
Kinda a figure of speech but I do use a fair amount of old time testors plastic model cement. The exact parts today was main landing gear, then moving on to putting in the exhaust nozzles and pushing to hard and displacing the starboard landing strut.....stuff like that, not taking my time.
- Joined
- Dec 1, 2024
- Messages
- 313
Tube cement? They still make that? I recommend learning to use solvent cements and cyanoacrylate glues. The former come in different degrees of solubility "hotness," and the latter in different viscosities and setting times. These more modern materials make assembly much easier once mastered.Kinda a figure of speech but I do use a fair amount of old time testors plastic model cement. The exact parts today was main landing gear, then moving on to putting in the exhaust nozzles and pushing to hard and displacing the starboard landing strut.....stuff like that, not taking my time.
- Joined
- Mar 6, 2023
- Messages
- 2,239
https://www.amazon.com/Testors-TES3...cphy=9032294&hvtargid=pla-2281435178338&psc=1Tube cement? They still make that? I recommend learning to use solvent cements and cyanoacrylate glues. The former come in different degrees of solubility "hotness," and the latter in different viscosities and setting times. These more modern materials make assembly much easier once mastered.
lacrosse dad
Well-Known Member
- Joined
- Oct 16, 2024
- Messages
- 127
I have Revell contacta, I use Mr. Cement and I have Tamiya extra thin on my work table.Tube cement? They still make that? I recommend learning to use solvent cements and cyanoacrylate glues. The former come in different degrees of solubility "hotness," and the latter in different viscosities and setting times. These more modern materials make assembly much easier once mastered.
Edbert
Well-Known Member
- Joined
- May 16, 2024
- Messages
- 1,375
Even with modern CA, which is all I'd use on landing gear, I leave the bird on her back overnight to fully cure. I learned that the hard way once, woke up to crooked gear that had shifted while I slept.
I do hear that some folks use epoxy for LGs, have not tried that.
I do hear that some folks use epoxy for LGs, have not tried that.
lacrosse dad
Well-Known Member
- Joined
- Oct 16, 2024
- Messages
- 127
My interactions with CA has not been well recieved. This exact model I had some Eduard after-market cockpit pieces, I used the belts but after trying to glue the canopy latching mechanisms I had my fingers glued together, my pick-ups glued to my work bench...not a good look for me.Even with modern CA, which is all I'd use on landing gear, I leave the bird on her back overnight to fully cure. I learned that the hard way once, woke up to crooked gear that had shifted while I slept.
I do hear that some folks use epoxy for LGs, have not tried that.
- Joined
- Dec 1, 2024
- Messages
- 313
What you need are these: https://www.scalemodeladdict.com/posts/247118/. For larger amounts, several manufacturers and hobby tools outlets sell a conical tube that fits over the bottle top and has a small opening. Also, you can put a drop of CA on a glass plate to pick up with the applicators shown in the link.My interactions with CA has not been well recieved. This exact model I had some Eduard after-market cockpit pieces, I used the belts but after trying to glue the canopy latching mechanisms I had my fingers glued together, my pick-ups glued to my work bench...not a good look for me.
lacrosse dad
Well-Known Member
- Joined
- Oct 16, 2024
- Messages
- 127
Similar threads
- Replies
- 15
- Views
- 743


