Geonature
Active Member
- Joined
- Jan 23, 2022
- Messages
- 106
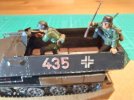
Hi everyone! There is a new project on my workbench: the 1/35 german Hanomag Sdkfz251/1.
After modeling several model railroad structures, I have learned that it is far easier to paint as I go because painting when the model is done make some spots completely unreachable.
So after adding two layers of black primer, I painted the main parts with a dark yellow from Vallejo. I must say that I don't have an airbrush and can't use spraypaint because I have a little parrot and because it's -15 Celcius outside. I do all my painting with a brush.
But because I am still new to scale models, I would like your advice on my next steps. Should I began weathering the inside of this vehicule? What else?
Thanks for your help!
")