The RANCOR

YOULI

That which does not kill us makes us stronger !
Joined
Nov 28, 2011
Messages
947
Can't believe I never present the Rancor with you guys. So many kits, so many projects, I simply forget sometimes to share the obvious from time to time (there's more, like a Robocop soft vinyl figure, not a legal one I presume...).

So here is the RANCOR the original soft vinyl kit that I purchased years ago in a comic shop at Brussels (Belgium capital).


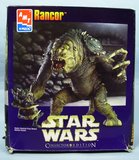
I built it, the Gamorean guard too, painted it, and it's nearly completion but there is so many pictures token and it's so difficult to check on my photobucket account that, for the time being, I suggest you watch the Work In Progress on my Facebook album.

Soon, there will be real pictures here, but you will have to be patient :)

http://www.facebook.com/media/set/?set= ... 472&type=3
 
Some teaser with some pictures to show you the progess on that project.
The rancor and the gamorean guard are done, I've even found a stand to put them on, I plan to build a big diorama for them later this year (with the bones, the walls, even the lights from the roof for a "real" ambiance).

I'll go with a loooooong wip since i've built and painted it for the past six months...

Stay tune guys ! :D


OK. So obviously i'm late to update thiw WIP about my Rancor who's done for weeks now.

I have to take you in a trip to the past.


THe model kit is from AMT but is Soft VInyl. It's a beautiful sculpture of the Rancor in a 1/12-ish scale (about the same size than the toys figures). It's sold with a Gamorrean guard who's about to be his lunch.

You need some documentation even though the box is filled with beautiful pictures of the model kits built and painted. I choose to use my books and star wars files...


Soft Vinyl kits are easy to deal with but have a major issue : they grew old very badly. Heat and time modify the shape of the parts (it's hollow) and my model kit was about 20 or 15 years old. So the fit is not perfect and I'll discover that glueing the arms and legs will be a real challenge.

But first of all the dinner.. uh... Gamorrean guard.

The guard is made of 5 different parts all well detailed. The guard is made to be in the hand of the Rancor, grabbed during a futile escape.


I'd choose some parts from Q tips and toys to fabricate the bones you find in the cavern. Later I'll work on dinosaur toys and other things I've found useful like... combs. :D


As usual I used my Citadel Spray can, Chaos black for a base color.


Once dried I spray some white skull (Citadel) on it to obtain somewhat a preshading surface. Then I cut the excess of soft vinyl in order to build the green piggy. Most of the time this kind of parts are put together, here you have to glue them.


Painting is a simple and pretty straight forward phase. Still citadel paint, easy to use, with simple brushes, the washes and inks facilitate the processe of shadowing and the dry brush the lighting effects...


The all paint process and glueing took me less than a day.


And now th Rancor. Say hello Rancor... :D "Graoooowww !"

 
The rancor is made of a few parts, 10 or so... It's pretty big and it's going to be bigger once built.
Like the guard I put a chaos black base coat and then a White Skull coat. The soft vinyl excess are still there to help me grab the parts without damaging the paint.


Then I used a really big brush to paint it all brown, beige for the claws and red for the mouth...


Then it's all dry brush and washes technics... But it's not that easy since I wanted the jointed parts to look "inivisible". So I had to use mastic plastic from prince august and Green stuff... A LOT of it...

First the head.


The mouth and teeths are already "treated" but will be correctly painted later. Same thing for the black eyes.


The ear's ring is cut since it's not as good as the real thing, don't you think ?


The guard will soon meet his fate... Sorry about him...

 
We'll now have to deal with the glueing of the limbs of the Rancor in order to permit him to devour our poor green little piggy. The parts are glued with Super glue and some accelerator from Army Painter.


Some joint are dealed with Mastic Plastic...


Others have to be re-sculpted with Green stuff. First of all I had to fill the big and small gaps too... We do not want a perfect smooth surface but muscle strings and scaly skins, right... So I used different technics, small green stuff applied like muscle and toys to make the surface right... A plastic orange, tools from "Mad Scientist", a toothbrush... And of course the good old toothpick and when needed a sculpt tool (not too often :) ).


The thing is to check on a regular basis that the pause and the movement seems right...


Here is a look to the tools.


A quick paint of the surfaces show the imperfections. It's Okay but I can do better.


A quick look at what kind of material I'll work with to do the bones and skulls in the cavern... Combs, dinosaur and monsters toys...

 
What an amazing build! The painting is looking incredible. I'm currently sculpting a Rancor and it is very tricky! - Where are those yellow texture stamps from?

Chris
 
Thanks

An old toy names "Mad Scientitst" there was an alien bug you could open to check the organs with slime (disgusting) and a laboratory in which you could place monsters you assembled with skeletons, body armor and some goo that was disolving when place in soap water.
In order to create the monster you had some stamps for the skin and even molds for the head.
The very same toy was made for Terminator and, I believe, Wolverine toy line.

monsterlab.jpg

80's Mad Scientist Monster Lab Toy Commercial

http://youtu.be/oyQUvMT7tAw

<iframe width="420" height="315" src="//www.youtube.com/embed/oyQUvMT7tAw" frameborder="0" allowfullscreen></iframe>
 
OK so we resume the flesh adding to our Rancor here. Ther's obvious gaps, and details missing.
Thanks to Green stuff, i'll cover the surface right on ! And even some help form Mastic plastic and White Tamiya putty... :D


After this another coat of paint and inks and washes is done on our favorite green piggy eater. So far so good.


Will we let the Rancor free ? No, since we have to check its balance, the pause and movement and event do the eyes correctly and add some slobber or slime on his teeth.

 
Thanks Scott :D

Well what should we do now with the Rancor ?

While glueing his hand nd reinforced it to grab correctly the Gamorean guard, it appears that both the hand and the green piggy needed a little more attention with Mastic Plastic intervention.


So here we go with the Mastic Plastic from Prince August


First the Guard, mostly around his belly.


Then the Rancor, the bracelet need some attention.

DSC06147_zpsc01b77e6.jpg


Now the fate of little green piggy is settled. But... What ? I need to hand paint more details on the rancor body, some scales, picks, claws, use inks, washes... My, my...


GRRRROOOOOAAAAARRR... I'LL BE BACK !!!

 
OK now we have to pay attention to details. A lot of details.

DSC06407_zps7683567f.jpg

The Rancor is impatient, he wants to grab the paint bottles all by himself. :D

First the teeth. We have to dry paint them with bones color, from citadel... Or rotten flesh or whatever they call it nowadays.


Second, same thing for the claws.


And what would take a lot more time, the picks and sticks he have on his skin especially the back and elbow.


My first attempt to make slime was not very conclusive. It's too thick. I made it from white glue.


What I need is something thin and partly invisible to guide the glue until it's dry and become clear (or clear enough). And I used... Cat hair... Furr ? Anyway a bit of glue here, and there, a hair, more glue and "voila"... A balancing and very much alive-like gue and slimy figure.
In the mean time I painted deep black the eyes, put a drop of white, painted then with clear varnish and it give him the apparence of life and vision. The claws and picks and teeth were treated with heavy washes brown and dark brown...


I must say I'me very satisfied with the result. Here, Mister Rancor, here is your Lunch... Now stay put Mister Green piggy, and stop whining.


I even thought of giving Mister Skywalker here, but this old toy is not very convincing (the pose, the sculptur...).


And now the final pictures of the ensemble, before making the diorama with bones and stuff...


See you soon for the small diorama (I intend to make a big one but not this year... Too busy). And, yeah, he does'nt have his ear ring and chains but it has been done ever since. :D
 

Latest posts

Back
Top