Splashcoat
New Member
- Joined
- Oct 9, 2010
- Messages
- 421

This is a kitbash of a Spacemarine assault buggy that I made for a friend who's into the tabletop battle game, Warhammer 40K.
It's based on the chassis of a Tamiya 1/35 scale KleinesKraftrad which I've had laying around for years but put off building due to it's somewhat dated molding - it's a nifty little kit but it's been eclipsed by more accurate, modern kits produced by the likes of Dragon. Not wanting to just pitch it, I decided to modify it to Warhammer "standards" and make a unique addition to the gaming table.
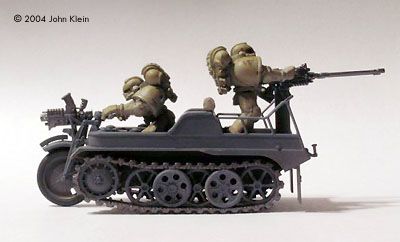
The vehicle was built pretty much straight-from-the-box; the only major alterations being the omission of the rear bench seat and the addition of a pedestal mount for the rear guns. The pedestal is simply a length of plastic tube that I glued into place and dressed up with a few scrap pieces of photo-etched brass. The guns are Games Workshop items which are included with the Spacemarine figures.
I connected two of these "bolters" together with scrap styrene, drilled out the gun barrels and grafted on new extended barrels from a 1/35 scale .50 cal. machine gun accessory set. I glued this assembly to a short length of styrene rod which slides into the pedestal. A "bolter" was also grafted into the headlight bracket in place of the headlight.
The styrene Spacemarine figures are from Games Workshop and are supplied in pretty generic, stiff poses. The figures were modified to fit into the driver's compartment and to grip the rear guns more naturally. I cut the figures apart at each natural joint (elbows, knees, wrists, etc) and re-assembled them using thin wire super-glued into the ends of each joint to act as a flexible pin. I could then fit the figures to the vehicle and re-position the limbs until I was happy with the poses; once I was satisfied, I fixed each limb into position with a drop of super glue. When the glue was dry, I re-sculpted each joint using Milliput, a two-part epoxy putty. I also drilled a hole in the driver's left hand so he could grip the handlebars properly.

Both the KettenKrad and the figures were primed with grey automotive primer to even out the finish of all the dissimilar materials involved. The Kettenkrad was finished in Tamiya medium grey and the figures were painted Tamiya Dark Yellow. Both were then weathered with oil-paint washes, pastel powders and silver pencil. The figures were then glued into place and I declared it complete.

I'm pretty happy with the way it turned out, it was a fun and easy build and I'm sure it will create much controversy at the gaming table regarding its legality as a gaming piece - until someone smashes it with an enchanted 20-sided die that is.
")