Revell 1:48 F/A-18 Super Hornet build... My noob adventures

glennonrp

New Member
Joined
Dec 23, 2011
Messages
82
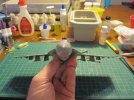
So, I'm building this mode. I'm working on a Strike Eagle, too, but, I'm waiting for a replacement top fuselage. So, this is my project.
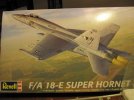
A-18%252520model%2525201.jpg

I have built a few models but this is my first in a long time. I will likely make a lot of mistakes. But, I plan to have fun doing it. Here's my progress:
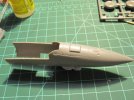
A-18%252520model%2525202.jpg
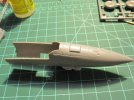
Nose built. Note the "seam filling" by CA glue.
A-18%252520model%2525203.jpg
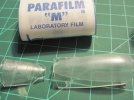
Canopy parts masked with Parafilm. I have no idea if that will work as I never did it before.
A-18%252520model%2525206.jpg
A-18%252520model%2525208.jpg
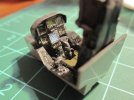
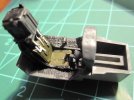
Cockpit built and painted with decal.

Thanks for looking! Any comments or suggestions are welcome. I know I have a lot to learn.
 
Only issue I see so far is the joint of the upper nose piece to the forward fuselage halves. I'd address the fit first or there may be more fit problems afterwards. great work on the cockpit, been building model aircraft for ages and I still struggle with the interiors. And I've tried many times to use parafilm to mask canopies bujt I have never been sucessful, they never stick on properly. Wondering if I am working/stretching the stuff too much.

Your on the right path, having fun is the first priority...
 
Carsenault said:
Only issue I see so far is the joint of the upper nose piece to the forward fuselage halves. I'd address the fit first or there may be more fit problems afterwards. great work on the cockpit, been building model aircraft for ages and I still struggle with the interiors. And I've tried many times to use parafilm to mask canopies bujt I have never been sucessful, they never stick on properly. Wondering if I am working/stretching the stuff too much.

Your on the right path, having fun is the first priority...

Would you mind being a bit more specific about the seam issue? I'm not sure what you mean. Do you have a suggestion on a way to handle this issue? Is it the seam in the pic? Thanks for the feedback!

I'll let you know how the Parafilm goes.
 
adampolo13 said:
glennonrp, great work on that cockpit!!!

Thanks, Adam!

A little update: I picked up a Touch-n-Flow and played with it tonight. I tried using Tenax 7R with it but I might have just been doing it wrong because it was dripping like crazy. Or, it's just too thin for the applicator. I spilled a bunch of the Plastic Weld that came with the TnF, too, trying to fill it. I think I figured out how not to spill now, though.

A little painting was done of the air intakes and turbines. The cockpit got glued in place.
 
glennonrp said:
Carsenault said:
Only issue I see so far is the joint of the upper nose piece to the forward fuselage halves. I'd address the fit first or there may be more fit problems afterwards. great work on the cockpit, been building model aircraft for ages and I still struggle with the interiors. And I've tried many times to use parafilm to mask canopies bujt I have never been sucessful, they never stick on properly. Wondering if I am working/stretching the stuff too much.

Your on the right path, having fun is the first priority...

Would you mind being a bit more specific about the seam issue? I'm not sure what you mean. Do you have a suggestion on a way to handle this issue? Is it the seam in the pic? Thanks for the feedback!

I'll let you know how the Parafilm goes.

I have the same kit in my "to build" pile, havent touched it yet, though I may do it soon to go back to my comfort zone for a while.

The seam I am referring to is in this picture...

A-18%252520model%2525202.jpg

Its the joint between part #93 (nose top) and part #3 (fuselage front right half). the seam alkong the front edge of the nose top looks great, but it looks like there may be a bit of a step there at the back part of the seam, or it may need to be just filled with some putty. The parts should sit flush with each other. If they are not lined up right with each other, you may have trouble installing the front windscreen. if you do fill that gap with putty, remember to rescribe the panel line that would be there. if it is out of step, you might be able to get away with just applying some more liquid cemnet tothe joint, then after a few seconds, work the parts to re alling them. Hope this helps.
 
Okay, that's what I thought you were talking about. I used CA glue for that joint. Is there a good way to work around that or is putty my only recourse?
 
You can by a debonder for CA, if you just used a little bi, you might be able to just pop it int he freezer for a bit then it should be brittle enough to just snap apart cleanly. If that dont work, putty would be the best way to correct it.

CA is great stuff, but I never use it to join up the kit parts, it sets up too fast and does not give you time to line things up correctly. Proper plastic cement will allow you plenty of time to line everything up correctly, and for long seams, is one of the strongest adhesives. I use Tamiya extra thin for general model building and I use Tenax 7R for those really long seams when I am using a touch and flow applicator. Save the CA for attaching resin and photo etch parts to you kits.
 
I just bought a Touch-N-Flow last night. I think you're spot on about the different uses. I was trying to see if I liked using the CA. I thought it might fill the seam better. I'll have to mess with the part tonight to see if I can realign it. I don't want to use putty if I can avoid it so I can save the little details modeled into the plastic. Thanks for the hints and clarifications. I think I need to move more slowly and deliberately as I build. I only get an hour here or there and I think I rush sometimes so I can show progress.

I also got a Flex-I-File and it did a great job with the nose seams. Liking that tool a lot!
 
:eek:. Wow. That's gonna be a big Girl!


Keep up the good work!
No need to rush! Take your time! She will keep you busy for a while!
 
schweinhund227 said:
:eek:. Wow. That's gonna be a big Girl!


Keep up the good work!
No need to rush! Take your time! She will keep you busy for a while!

Thanks, Schweinhund! I got some work done these last couple days but haven't gotten pictures. I built and installed the jet intakes, and the wing tips. I painted the gear, wheels, and the radar pod thingy. I also installed the aileron actuators and the missile pylons. Since I got the TNF applicator, my joints are better. This kit goes together pretty well and with good joints I barely need any filler that I can see.

I also realized I hadn't put Future on my canopy parts so I took the Parafilm off and dipped them. I goofed the Parafilm on the little canopy and scratched it. So, I polished out the scratch and dipped it again. When it dries I will remask it. I think I will hold off installing the landing gear so painting the body will be easier. I will be painting it as soon as I get the canopy installed.

Myke said:
Cockpit looks great! Nice work.

Thanks, Myke! I hope the rest of my build looks halfway decent.
 
Tragedy strikes!

I appear to be missing some vital parts! I already knew I was missing the nose gear landing light and the HUD, but I had resigned myself to either doing without or scratch building something from the left over sprue. But, now I find that I am missing the canopy deck, and the left and right canopy frames. I can't finish the canopy assembly without those parts. So, I went online and ordered the replacements from Revell. But, I also ordered a replacement fuselage for my F-15 that was malformed back on January 3 and I still haven't received it. I don't expect to receive these parts before February. Sigh.

I may start painting anyway. I have to paint all the munitions, for one thing. I could also paint the panel lines if I mask off the canopy area. Heck, I could paint most of the plane if I do that. So, I might.

Anyway, here's what I have so far:

hornet%252520build%2525201.jpg
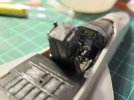
The cockpit installed.

hornet%252520build%2525202.jpg
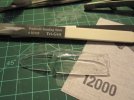
I had a seam line in the canopy. But, this tri-grit polishing/finishing stick plus some 12000 grit polishing cloth took it out.

hornet%252520build%2525203.jpg
After I applied Future, it looked crystal clear!

hornet%252520build%2525204.jpg
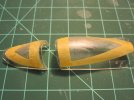
Then I masked it again with Parafilm m and some Tamiya tape, just to be sure my edges were clean.

hornet%252520build%2525205.jpg
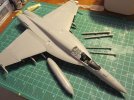
Here's the bird with some munitions and the centerline tank.

hornet%252520build%2525206.jpg
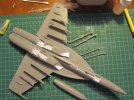
And the belly of the beast.

hornet%252520build%2525207.jpg
And a shot straight on.

That's the build so far. Any comments or suggestions are welcomed. Thanks for checking it out! Hopefully someone will learn from my mistakes. :)
 
Looks good, bummer about the missing bits though. Hopefully you wont have to wait too long to get the replacements. I kisy looked mine over to make everything was in there, looks complete as far as I can tell.

Odd bit in the instructions, not sure why they tell you to paint one canopy rail black, and the other grey, they should both be the salme color, more than likely black.
 
:eek:. I feel your pain Dude!

Life ain't fair sometimes!

Well.... Either continue as much as you can or pack her up! And move on to better things ? We will be right behind you! Either ways

It was going so well!! Bummer!
 
Carsenault said:
Looks good, bummer about the missing bits though. Hopefully you wont have to wait too long to get the replacements. I kisy looked mine over to make everything was in there, looks complete as far as I can tell.

Odd bit in the instructions, not sure why they tell you to paint one canopy rail black, and the other grey, they should both be the salme color, more than likely black.

Yeah, that is weird. Their paint scheme for the missiles is a little off, too. The AIM-9x is white with a gray nose and forward fins along with a little dome at the front for a camera. But, they call for it to be gray with a purple nose. Also, the AMRAAMs are called out as being the darker gray but everything else on the bottom is that light gray. So, I googled the images and started painting them that way.

I am not hopeful that the parts will show up very soon. It's probably my fault. I probably got overzealous in tidying up and tossed them. I find it it hard to believe I did that but it's the simplest explanation. Otherwise someone is messing with my stuff! But, that's impossible!!! No one touches my stuff. :)

schweinhund227 said:
:eek:. I feel your pain Dude!

Life ain't fair sometimes!

Well.... Either continue as much as you can or pack her up! And move on to better things ? We will be right behind you! Either ways

It was going so well!! Bummer!

Thanks, brother. It will work out, I'm sure. I started painting the missiles and i thought I would hand paint the preshading lines. A number zero brush and some flat black. Is this a bad idea?
 
Per shades on the Air craft panel lines? By hand? I don't see why not? As long as you don't put too much paint!

It could leave a demarcation line that your primer or base coat will not be able to cover (hide)!

But if you go with a light coat? I don't see why not?

Take your time!
 
You never know, you might find the pieces some day when you are not looking for them, thats happened to me many times.

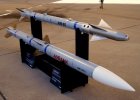
I've learned over the years, never to fully trust painting diagrams, always check your references. Not sure about the white body on the Aim-9X, possibly on a training round or a testing prototype, standard color on all current US made air to air is light ghost grey. Here is a coupel of inert missiles, The AAMRAM should have a white seeker head with dark metallic fins, the AIM-9X you could go with a lighter metallic shade for the fins and warhead, chrome silver for the seeker.

DSC09295-ec.jpg
 
schweinhund227 said:
Per shades on the Air craft panel lines? By hand? I don't see why not? As long as you don't put too much paint!

It could leave a demarcation line that your primer or base coat will not be able to cover (hide)!

But if you go with a light coat? I don't see why not?

Take your time!

Will do. One reason I'm doing these less expensive models first is to get some lessons under my belt so I don't screw up some $60 Hasagawa. So, it will be interesting to see how it works. I am brand new to airbrushing, too, so I'm as likely to screw up the paint job either way. :lol:

Carsenault said:
You never know, you might find the pieces some day when you are not looking for them, thats happened to me many times.

I've learned over the years, never to fully trust painting diagrams, always check your references. Not sure about the white body on the Aim-9X, possibly on a training round or a testing prototype, standard color on all current US made air to air is light ghost grey. Here is a coupel of inert missiles, The AAMRAM should have a white seeker head with dark metallic fins, the AIM-9X you could go with a lighter metallic shade for the fins and warhead, chrome silver for the seeker.

Wow! Great pic! I saw several but none this good!!! Thanks for sharing that!

My shades of gray are not going to be accurate. I am using some Tamiya and have had trouble getting good information about which grays equate to the Light and Dark Ghost Grays. This isn't a competition piece or anything. It's practice, so it isn't crucial that it is 100% accurate but I still like to try.

I didn't know the fins were different colors! Far out! Well, there's some work to do until maybe my parts show up. Or, maybe the F15 parts will arrive. I also picked up an A-10 so that's my backup project. :)
 

Latest posts

Back
Top