Painting soft-edged camouflage patterns
- Thread starter Geonature
- Start date
Geonature
Active Member
- Joined
- Jan 23, 2022
- Messages
- 106
What do you mean exactly? I am not sure I understand.Drybrush the boundaries together .
Like you do your makeup before you go out on the town
urumomo
Well-Known Member
- Joined
- Mar 18, 2013
- Messages
- 7,574
Paint the colors and then when that paint is dry use a dry brush , minimal paint , to blend the borders together .
Like if it's yellow next to green , use a dry brush with that yellow to encroach over into the green and then the green over onto the yellow . So there isn't a definitive border between the 2 colors .
I don't know how else to explain it . I can show you - but I'm in Texas .
Like if it's yellow next to green , use a dry brush with that yellow to encroach over into the green and then the green over onto the yellow . So there isn't a definitive border between the 2 colors .
I don't know how else to explain it . I can show you - but I'm in Texas .
Geonature
Active Member
- Joined
- Jan 23, 2022
- Messages
- 106
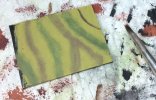
Thanks everyone. I have made a little test on a scrap piece of plastic (a lot larger than my 6mm model).
1. I drew thins lines of chocolate brown and green to give me an idea where the lines will be.
2. I mixed half of dark yellow with half of chocolate brown, remove most of the paint on a towel and then took a drybrush and push gently from one side of the chocolate brown line to the other.
3. Then, I mixed half of dark yellow with half of green, remove most of the paint on a towel and then took a drybrush and push gently from one side of the green line to the other.
4. Finally, with the same brush, I took a little bit of dark yellow paint, remove most on a towel and then gently push the brush over all the surface of the green and brown lines.
Here is what I have done with my technique. What do you think?

Geonature
Active Member
- Joined
- Jan 23, 2022
- Messages
- 106
Marktastrophe
Well-Known Member
- Joined
- Nov 19, 2021
- Messages
- 371
Thats looking good. You may have a better time blending the paint on the kit with a makeup applicator.
The Tamiya "Weathering Master" effects come with little sponge brushes, and you can buy some of those...but if you are near somewhere that sells makeup, you can get the same thing for less that way.
something along these lines:
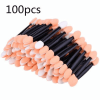
The Tamiya "Weathering Master" effects come with little sponge brushes, and you can buy some of those...but if you are near somewhere that sells makeup, you can get the same thing for less that way.
something along these lines:

Geonature
Active Member
- Joined
- Jan 23, 2022
- Messages
- 106
Thanks for the info. I will check that.
What I was doing is that, after painting the model dark yellow, I added the brown and green camouflage. Then, with a cheap paintbrush, I just drybrushed my model with a little bit of dark yellow (same colour that I used at the beginning). Finally, I drybrushed my models with Vallejo Iraki Sand.
When do you suggest using the sponge brush? When I am applying the camouflage or after?
Marktastrophe
Well-Known Member
- Joined
- Nov 19, 2021
- Messages
- 371
I would use the sponge to do the dry brush blending, it looks much smoother dragging the color out with a sponge vs with bristles.Thanks for the info. I will check that.
What I was doing is that, after painting the model dark yellow, I added the brown and green camouflage. Then, with a cheap paintbrush, I just drybrushed my model with a little bit of dark yellow (same colour that I used at the beginning). Finally, I drybrushed my models with Vallejo Iraki Sand.
When do you suggest using the sponge brush? When I am applying the camouflage or after?
blakeh1
Well-Known Member
- Joined
- Oct 26, 2011
- Messages
- 1,127
Great results!
I might also add that oil paints might allow you to blend and get those soft edges a little easier
another option if using acrylics is the "glazing" technique
You can use something like Vallejo Glaze Medium
it lets you do very thin, translucent layers and blending
I might also add that oil paints might allow you to blend and get those soft edges a little easier
another option if using acrylics is the "glazing" technique
You can use something like Vallejo Glaze Medium
it lets you do very thin, translucent layers and blending
Similar threads
- Replies
- 1
- Views
- 425
- Replies
- 5
- Views
- 596
- Replies
- 16
- Views
- 933
- Replies
- 16
- Views
- 688

