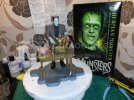
Moebius 1:9 Herman Munster

Joined
Apr 28, 2015
Messages
69
[youtube]https://www.youtube.com/watch?v=fAq3LV6QF4s[/youtube]

Moving swiftly on with my next model, this time is the Herman Munster kit from Moebius.

My wife cast her eye on this kit as we were making our way to the exit of the model fair a couple of weeks ago, so this kit is for her, just to keep her quiet.

Started on the construction, which TBH isnt much as everything is half & half to be glued & very quick progress indeed.

Once the Herman parts were all glued together, I sanded the seams & once I filed them down, they dissapeared quite nicely.

A few small issues here & there, namely the small gap in the arms mounting to the main torso part of Hermans jacket & the lack of securing pegs for his boots to the base.

But with a couple of the spare sprue moulding pegs Ive managed to sort that out.

Cheers,

Wayne.
 
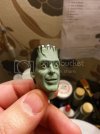
Just finished doing Herman's head.

20151206_201920_zpslnyfeltp.jpg

Started off with some Americana Sea Glass Green, then gave it a couple of applications of Folkart Greenscape wash.

Then painted the hairline all around his head & the rest of his hair in black.

Scar on his forehead also black & the staples in silver.

Eyeballs in white & his pupils in black ( just glad he dont look cross-eyed.

Did a little of his lips in black, trying not to go overboard.

Bolts on his neck are in Gun Metal.

Im just glad the Sea Glass & Greenscape paint finally turned up from America.

Its the most difficult intricate painting ive ever done, but it aint turned out too bad.

Cheers,

Wayne.
 
.. " Americana Sea Glass Green "

;D ;D Now that's a name
I feel compelled to work those words into my life .

I've been seeing a lot of cool Moebius builds lately . need to check out their catalog .

Look forward to more ,
Cheers ,
Uru
 
[youtube]https://youtu.be/H7CZxXRUMp0[/youtube]

20151212_110344_zpsmqcct6hz.jpg

20151212_110408_zpsbksfpzsf.jpg

20151212_110435_zpszoxe1c46.jpg

20151212_110532_zpsxlbk3py6.jpg

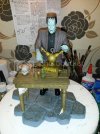
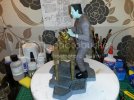
Herman is all done, its finale time.

I started by glueing his feet to his legs, then clamping them whilst the glue dried.

Then once dry, took the clamps off & glued the completed legs & feet to his torso by glueing the back square mounting inside his torso into his bottom & pushing the front of his trousers into the bottom of his jumper.

Using string to tie around his legs to around the shoulders & using foam to protect the areas from rubbing the paint off, I then pulled the string quite tightly to help make a more secure fit whilst the glue dries.

Once the glue dried, I mounted Herman's complete body to the base using the pegs & glued around them.

My paint finally arrived from America, which was Americana Sea Glass & Folkart Greenscape, after doing a Google search on Herman's skintone & finding Nightowl on HobbyTalk Forums discussing which paint he used.

Using Nightowl's tip, I painted Herman's face & hands in the Americana Sea Glass & thinned down some of the Folkart Greenscape with some water to wash consistency & washed his face & skin a couple of times.

I then started on his facial features & once done & sealed, I glued his head & hands onto his body.

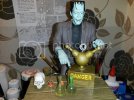
I built the table, which was the tabletop, the 4 carved sidepanels & legs into the square holes underneath the tabletop (which was really easy), primered it & painted it in humbrol brown, gave it a black wash to bring out the wood effect on the top & the carvings on the sides.

Putting all the instruments & glassware together, which started with the electrical box which was 4 sideparts & the eletrical conductor (all, again really easy).

Copper mixed with gunmetal for the box, humbrol trainer yellow for the "DANGER" lettering, humbrol metallic brass for the conductor.

The glassware was just a little green & washed with earthshade wash & glued to the table with clear 'n' glaze.

Skull was painted in white with some earthshade wash.

Base was painted in revell blueish grey & earthshade wash & humbrol mattcote.

Table (with instruments) was glued to the base & my wife is happy with the results.

Cheers,


Wayne.
 
Came out really well.

While the eyes came out fine, the best way for him not to look cross eyed is to have him look in a direction other than straight ahead. This way if one eye is a 1/2mm off, no one will be able to tell. HTH.
 

Latest posts

Back
Top