1/72 Airfix Avro Vulcan FINISHED

Re: 1/72 Airfix Avro Vulcan

I haven't been able to work on the plane as much as I'd like, but still managed to squeeze in a few hours here and there. Most work has been cleaning up seams, sanding, putty, scribing, you know, the usual. ;D
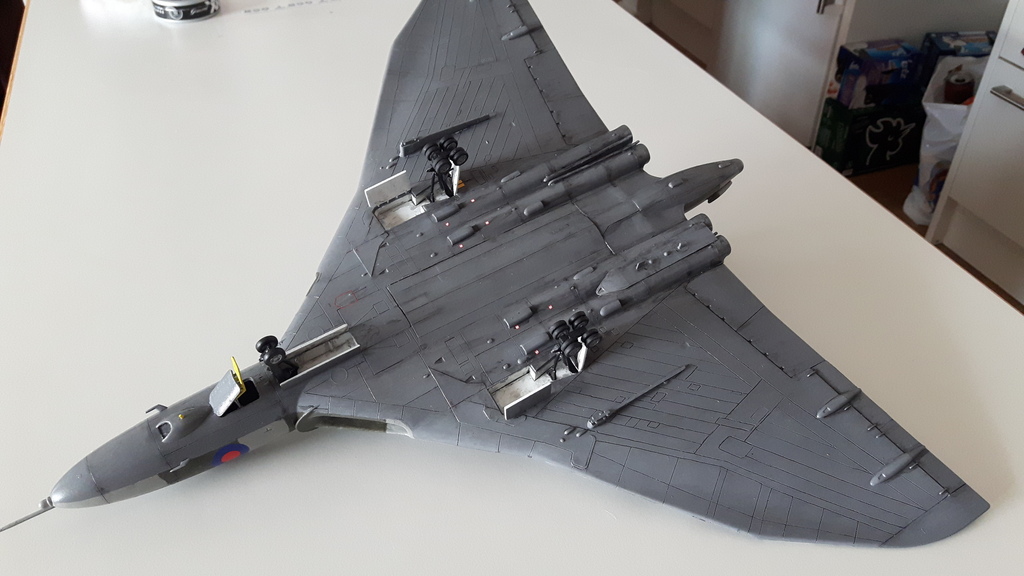
Last night the cockpit canopy went on and a last coating of white paint was applied to the inside of the air intakes. Bomb-bay doors were glued on, as were the scoops on the belly side. I wont even post pictures of it since it looks like a murder scene... Maybe after paint ::)

20160309_081341_zpsqhqnw6xf.jpg

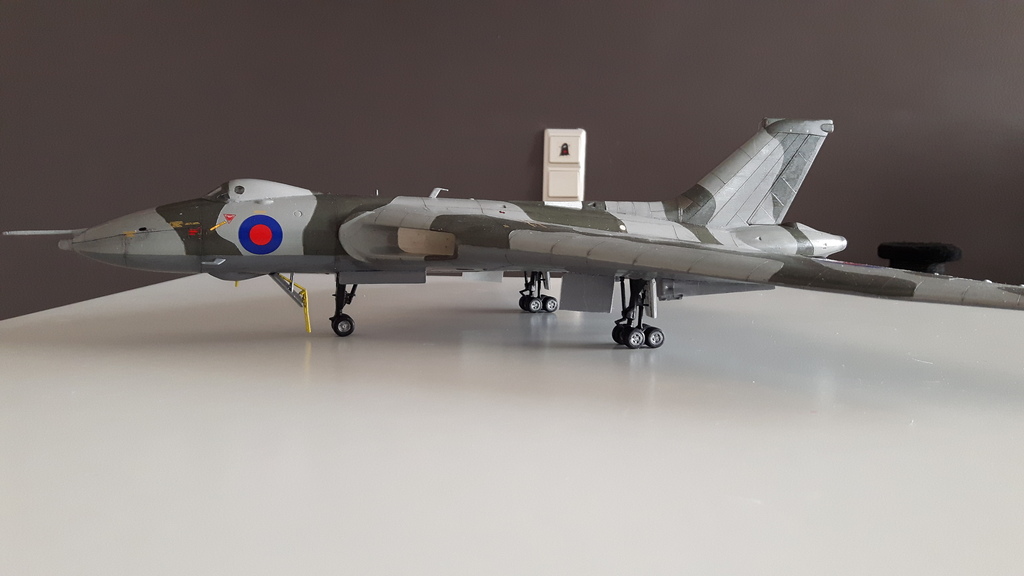
At this point I couldn't take another round of putty and sanding, so I believe she's ready for primer. The air intakes were a PITA to mask. Masking tape I found impossible to work with in the tiny space, so I went with bluetack (which isn't even blue) :mad: ;D .

20160309_085429_zpsrpash1vt.jpg

And finally, PRIMER!! As you will notice, the the putty seams are still somewhat visible under the paint. But I'm very happy with how it turned out, so I probably wont go in to fix any of them. However most importantly the scribed panel lines came out better than I ever thought they would!

20160309_095953_zpsbzojfxh3.jpg

20160309_100235_zpsshqp0fil.jpg

20160309_100037_zpsrmjlyi5z.jpg

20160309_100212_zpsotrmxeon.jpg
 
Re: 1/72 Airfix Avro Vulcan

Primer's looking good. Looks like your seamwork paid off
 
Re: 1/72 Airfix Avro Vulcan

After the primer I brushed 2 coats of Humbrol enamel light gray topside. For the green camo pattern I used the dark green acrylic that was provided with the package. Unfortuantely I wasn't terribly impressed and the can was a bit small so I ran out before I wanted to. Will have to get some more to touch up the camo at a few places, including a few spots where the masking tape ripped some paint of. ???

The Vulcans' bellies were apparently painted darker for the Falkand night bombings., so I got some Vallejo Dark Sey Grey acrylic for the belly, that'll be next.

Pictures: ;D

20160312_155208_zpswyaledtr.jpg

20160312_204552_zpsedfzthq4.jpg

20160312_204620_zpscjyoafcf.jpg

20160312_204741_zpsknqpc4vr.jpg

???
20160312_204653_zpsgb4qwwp7.jpg
 
Re: 1/72 Airfix Avro Vulcan

Camo looks pretty good, for the most part.
Sorry to see what happened with the tape there
 
Re: 1/72 Airfix Avro Vulcan

I got the belly painted with Dark Sea Grey, and have to say, I absolutely love Vallejo's paint. No issues with peeling by the edges when I removed the masking tape, and brush strokes are barely visible. Also the paint smells wonderful! ;D ;D

Now the only issue seems to be fixing the green camo and I'm unsure how to go on about it. I'm tempted to repaint it with Vallejo paint, but it's unlikely the shade is the same. In my opinion the safest bet would be to get more of Humbrol's paint, either acrylic or enamel, any idea if the shade varies between those? Advice is more than welcome... :)
 
Re: 1/72 Airfix Avro Vulcan


A great tip to use for cammo....

Use blu-tac or similar product to mask off the lines to want to mask off. Fill in the areas you dont want to paint with masking tape and spray away. For rattle cans I use the Tamiya paint range. They're a little more expensive than Humbrol, but the finish is far far superior, and dries pretty quickly too.

Because you've used blu-tac, it creates a nice soft natural line between the cammo colours. It also doesn't rip the paint when you remove if from the aircraft.

Give is a try on something first to try it out.
 
Re: 1/72 Airfix Avro Vulcan

Looks real good. Great work on the scribing of the panel lines I have at least 20 older 1/72 kits I want tombuild but need to scribe lines for. I like your technique
 
Re: 1/72 Airfix Avro Vulcan

I have recovered my motivation and resurrected the Vulcan build. Some progress of the wheels and belly of the plane. Most notably I experimented with weathering and filling the panel lines with a dark wash. Also applied most of the decals from the kit I could use for XM607. I have ordered more decals, so that will probably be a week or two.

The top is missing only a few decals on the tail and obviously the registration:

20160824_192001_zpspni57xre.jpg

Weathering ::) :

20160824_192022_zps4ygqczrf.jpg

Some of the worse panel lines on the top side, but otherwise pretty pleased:

20160824_192049_zpsx42t5cq6.jpg

Better side of the nose :) :

20160824_192109_zpsjafgsddc.jpg

Some weathering has been applied to the belly, but it's still missing all the decals, ECM-plate and hatches:

20160824_192222_zpsvj8qzjvt.jpg

Edit: Looking at the pics I realized the pilots are visible through the side windows, which I'm pretty happy about. :)
 
Re: 1/72 Airfix Avro Vulcan

The Vulcan is almost ready now! I'm only waiting for the new decals and then I'm calling this baby done :) .
The kit itself was a bit of a challenge for me, and involved a lot more work than I initally suspected. Only regrets are that I didn't by the resin engine intakes and PE for the cockpit windows and engine nozzles.

Here's some pictures of how she turned out (minus the missing decals ofcourse ;D )

20160831_145027_zpsqxsrklwx.jpg


20160831_145111_zpscbyuriwl.jpg


20160831_143343_zps00meylkn.jpg


20160831_150820_zpsw77afiha.jpg


20160831_145013_zpsbwxvcyky.jpg


20160831_150946_zpszfwfmrd5.jpg


20160831_144951_zpsqsbuc2xy.jpg
 
Re: 1/72 Airfix Avro Vulcan

Good job!

I just got mine in the mail today. Did a quick dry fit and the intakes are not nightmarish, but I AM debating on getting the resin intakes.
 
Re: 1/72 Airfix Avro Vulcan

Smokeriderdon: IMO the resin intakes would be a big improvement and save a lot of time. Are you going to build OOB or make changes, and most importantly will there be a build thread? ;D

Thank you for the kind words!
 
I got my decals in the mail today and I have to say I'm very pleased with what Hannants delivered. Decals are good quality (some are more detailed than the kit's own) and there's plenty of them for any Vulcan build I believe. The package also included a leaflet for a few different Vulcan schemes. The leaflet was however low quality and didn't feature all panel lines for accurate decal positions.

The Decals:

20160901_150606_zpsiuklzwsl.jpg


And the finished product:

20160901_161825%201_zpswao4ra3n.jpg


20160901_161927_zps9zfmlway.jpg


20160901_162552_zps2fimkdpg.jpg


20160901_162426_zpsf6ejhgwj.jpg


20160901_161940_zpszfl7idjf.jpg


20160901_162634_zpsoolvxlyp.jpg
 
Having looked at your decal sheets, I will be ordering that. Do a different scheme. Aside from that and intakes, I will do OOB. And yep, I will do a thread. But it's not going to be for a while. Probably early next year.

Where did you see the intakes? I can find reviews, just having an issue finding them for sale.
 
Very impressed there, glad you took your time with it and didn't rush it. The decals look superb and I'm liking the subtle weathering too.

Wouldn't mind building one myself now :)
 
Thank you so much for your kind words! I love how encouraging everyone on the forum is. :)

Smoker, definetly looking forward to seeing your take on the Vulcan. I think I've seen the resin intakes on ebay atleast. The decal set was a pleaseant surprise too, most markings sharper and more detailed than Airfix's own. A shame I even used any of the decals that came with the kit.
And Mikey thank you for letting me know about Hannants awesome decals!! ;)

I really want to do a Handley Page Victor to acompany the Vulcan as my next build, and display them in some sort of diorama or a stand for both. My only dilemma is wether I get the old tool Revell kit for 20€ at a local shop or wait for Airfix to come out with their new tool which looks really sharp: http://www.airfix.com/uk-en/handley-page-victor-b2-1-72.html . Some images are CAD but I think it looks very good!
 

Latest posts

Back
Top