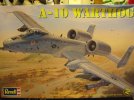
1:48 Revell A-10 Warthog... A Noob Comes of Age

glennonrp

New Member
Joined
Dec 23, 2011
Messages
82
My new build:
Photo%25201.jpg

My goal is to make less mistakes. I would like it if I managed to put this together without ugly glue blemishes and with improvement in my ability to deal with seams.

So far, I have painted the pilot and cockpit plus the front gear well. That is part of the starting construction. I glued in the 'pit and landing gear well, then cemented the fuselage. I tried hard to make good seams and used my Touch N Flow. The cockpit fit weird. It clearly was meant to be cemented against the side of the fuse and the other fuse didn't quite match up against the 'pit. Hmm. So, I used some CA glue and put some force into it. I got a clamp on it and left it for the night. I didn't take any pics yet but I hope to soon.
 
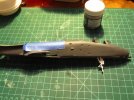
So, this is the beginning. I got the cockpit done, installed and my clamp job solved the problem with the fit. Just in case, I dry fitted the canopy and guess what I figured out! It turns out that this build only allows an open canopy. I'm a little bummed because I like a closed canopy. But, it is what it is. I guess I'll have to build another one. :) Got my eye on that Italieri kit, now, thanks to Adam. Anyway, the fit was good.

Fuselage joined...
Warthog%2520build%2520begin%25201.jpg

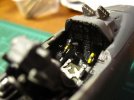
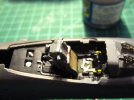
Luckily, since the canopy will be open, I like my job with the office. I didn't have the pilot in this shot, but, she's done, too.
Warthog%2520build%2520begin%25202.jpg
Warthog%2520build%2520begin%25203.jpg

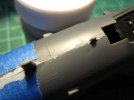
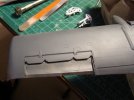
Not too happy with these seams... And, those panel lines don't line up. Dangit! What do you think I should do? Rescribe? Live and let live?
Warthog%2520build%2520begin%25204.jpg

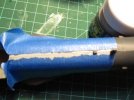
Trying to use Swanny's technique of seam repair
Warthog%2520build%2520begin%25205.jpg

I did make a little progress sanding. I took out a lot of the raised panel lines. Bummer. Swanny says you can run your razor knife at a 45 degree angle along the line and it will fix them. May try that. Reviews around the 'Net seem to indicate there's quite a bit of fit issues with this kit. So, should give me lots of practice fixing that sort of thing. :)

Thanks for looking, folks!
 
whooo, have fun, I just got done rescribing and riveting the whole airframe 1. because I hate raised panel lines with a passion and 2. Fixing seams AND keeping raised rivets without obliterating them and the raised lines around them is one tough job I'd rather not do.

Not building mine yet, just scribing and riveting for later, so I've got no construction tips for ya, other than you probably want to modify the spoilerons to the closed position. Revell stuck you with them open, when in reality they are almost never open on the ground. It's an easy fix.
 
Cool progress you have rolling Glen!

I haven't heard much of the kit, save for a bit of talk from Facemodels from Youtube. From what I picked up, yes, there seems to be a lot of stinker areas in the kit, but then hey, it's all about the experience! I myself have this kit in the stash and you're proving to be an inspiration/help when I get around to it.

As for the rescribing, honestly, that's a touch decision. I say build it how you feel, but if you really don't mind, I would go for rescribing - mainly because I think the more you do, the more satisfied (though not necessarily), and more connected to your model kit.

Keep it up!
 
Hey Gleenonrp I'm sure your build will turn out fantastic whether you decide to rescribe or not. My experience has been that I started slow, a panel line here, a rivet there, and worked my way through it. There are a few spots on my bird that I did not touch, mainly the underside of the plane. No matter what you decide I'm sure it will turn out great!!!
 
It should be mandatory that an A-10 build up should be present on the forum at all times. Keep it up...love the interior. Sucks about those panel lines and rivets not lining up. Nothing a little sanding, scribing, and drops of CA can't handle.
 
I was just thinking to myself..., this forum could use another A-10 build. I love this aircraft!
That sucks about the the panel lines matching up. I don't think there is an easy way to solve that problem. I would probably just let it go and try to kinda "trick the eye" with preshading or something. If I work a kit with raised panel lines I just re-scribe them all and sand 'em off.
That cockpit looks AMAZING too, can't see what the rest looks like.
 
Myke, Glorfindel, see below and let me know what you think about the scribing versus raised panel lines. I got a tool for scribing from Bare Metal Foil that works better than a sewing needle in a pin vise. It would be a lot of work, especially since I installed the wings and tail. Opinions?

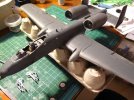
I got to build a bit more today and Thursday. I put the wings and tails together, modded the decelerons, installed the wings, scribed a bit, and painted some, too.

The wings and tail are on. I also have done a little scribing. Is it going to look funny if some panel lines are scribed and others raised?
A-10%2520build%25201.jpg

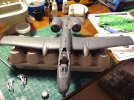
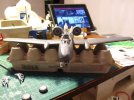
A couple shots to look at the wing and tail. The tail in the right leans a slight bit. :( I don't know what happened there. I tried to be very careful about it but still got it off a bit. I don't think it's terribly obvious, though.
A-10%2520build%25202.jpg
A-10%2520build%25203.jpg

I didn't like that the decelerons were molded open. So, I took a chance and modded them to be closed. I think they look okay. Not perfectly accurate, but it didn't cost me anything. Maybe next time I would buy some aftermarket decelerons instead.
A-10%2520build%25204.jpg

So, besides that, I painted some gear wells and the gear. I also finally got a replacement part for my F-15 and I put that together, a bit. So, I'm building two at a time right now. I like my little warthog, though. I hope it looks decent when I'm done.

Thanks for looking, folks!
 
Thanks, fumble. My progress was slowed by life and illness. I got pretty sick and am still not 100% yet. I am trying to fill some seam lines and and get it looking as good as I can. The wing seams, roots, and the gear cowlings needed work. So, progress has been slow. My eyes get tired and my hands shake so I take a break. Then, kids need attention and stuff. So, that's where it's at.

I know many were dying to know, so I figured I better end the suspense. ;)
 
glennonrp do all the surfaces on this kit have raised panel lines? If they do I wouldn't overwhelm myself and sand them off only to rescribe. If this thread is as you posted, a "noobie" to model making, then reintroducing yourself to the hobby with an entire surface sanding and rescribing, not to mention how many rivet holes there are on this plane, will make your stomach flip. I'd hate to see you toss your cookies during your first build in years. I think for completions sake I would agree with Myke and blend them in to try and trick the eye. Unless your goal is to learn all there is to learn in build #1 then chances are this kit will be started and stopped numerous times as you get inspired and frustrated with it's progress. I'd go for completion and take what I can out of it. I'm sure what ever you choose will be great. I'll be watching.
I know in the future I'm planning on another A-10 but with some after market sweetness for the cockpit. But that will happen in the future....no A-10 group build on the horizon for me.
 
Nothing beats the CT ANG doing low fly overs for the Veteran's Day and 4th of July parades in Enfield. Awesome machines. 8)

Your build is coming out great, just have fun and don't get all sucked into perfection. :D
 

Latest posts

Back
Top