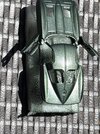
First time Airbrushing model car results

stevieb54

Member
Joined
Nov 20, 2023
Messages
33
Hey All, I attempted my first time airbrushing yesterday. I was really nervous about doing everything right and said screw it give it a shot. I have these metal cars that were given to me, 63 Stingray. I stripped it down, sanded and spray primered out of a can. Sanded that and tried the airbrush using MCW Highland green gloss enamel. Once I played around with the paint adjustment, it seemed to go ok. I used a reducer (2 parts reducer to 3-4 parts paint).

My end result is the paint seems a satin finish with some orange peel. I have yet to sand the coat and apply either another coat and/or gloss clear. Is this typical of finish when using a reducer, or should I have used a thinner instead? Looking forward to the middle or end of the learning curve. :O)
 
Orange peel indicates a heavy coat, try it again using lighter, mist coats..maybe 3 let the paint set up for a couple minutes between coats..
 
I do not think there's such a thing as an always-right ratio of paint to thinner, but 50-50 is a good place to start unless the paint is pre-mixed for airbrushing. In my opinion it is best to err on the too thin side since you can just keep going and adding more.

But unless there are drips I'd not be too worried. Be sure it hardenes completely, not just to the touch, but then you can sand down the orange-peel. Even use wet-sanding like in a real autobody shop. For the color coat 5,000 grit is probably enough, you just want it flat for the clear.

I used 10K paper with tons of water when sanding my clear top-coat, that is before using liquid polish and cloth.
 
That's not too bad..when I get a finish like that, full coverage of colour is good, I will wet sand with 800g and then 1000g and can usually get it smooth enough for clear.
Remember when painting, you only want colour coverage...not Shiney layers
 
Thanks guys, I will do some wet sanding next maybe tomorrow. Today the clamminess feel of the paint is fading away, so hopefully its enough cure time before I sand and clear coat.
What is this liquid polish used on clear coat? How is it applied and are the results that noticeable?
 
If it is enamel or lacquer, I'd let it sit for several days, particularly if it was on the thick side. If you try to sand it before fully hardened, it will make a mess.

I've discovered the hard way that dry to the touch is no indication that it is cured or not.

If you try, can you smell the paint? That can be a way to determine, but it depends on how good your nose is, so not exactly scientific.
 
"Smell the paint. If your nose sticks to the surface, it's not dry yet."

As Edbert said, not enuf reducer.
Thin that paint down some more.
Turn up the air pressure and spray lighter coats with plenty of overspray.
Give each spray a moment to set up.
If you lay it down too heavy, too quickly, it will puddle (the hammered look).
This is how I painted Hot Wheels bodies using enamels.
Is that a metallic paint? That just makes it worse.
Is the airbrush tip size big enough for the metallic (it's always an important consideration for metallics and thicker paints like enamels)
 
10-4 on sniff test. Its hard to see screen as I type looking through the car body stuck to my nose lol! Good points. I know its a .3 needle with a open running psi of 25ish. I varied the flow adjustment somewhere in the middle. Was I even close to the sweet spot? Just to reiterate this job is my guinea pig of painting, before I venture out into plastic car modeling. Sure appreciate your opinions.
 
Airbrushing is 75% science and 50% art. Just do the math …

You won't learn it all on one kit. The best way to learn to airbrush is to do a lot of it. Practice on "paint hulks" or scrap, and find the techniques that work for you.

Another consideration is ambient temperature and humidity. The closer you can come to "room temperature" (~70°F) and 50% RH, the better. If you cannot control temperature and pressure, you will need to adjust what you are doing with the air brush depending on conditions.
 
If it is enamel or lacquer, I'd let it sit for several days, particularly if it was on the thick side. If you try to sand it before fully hardened, it will make a mess.

I've discovered the hard way that dry to the touch is no indication that it is cured or not.

If you try, can you smell the paint? That can be a way to determine, but it depends on how good your nose is, so not exactly scientific.
The smell test IS the best way to tell if enamel is fully cured, and it can take a few days
As for lacquer or any solvent-based paints, it cures within hours. Thinkness determines the time let it stand for a day will if in sought.
Pep
 
As for lacquer or any solvent-based paints, it cures within hours.
Lacquers don't cure, they only dry, and drying time depends on thickness of the coat as well as ambient conditions. Paints, whether solvent based enamels or acrylics do cure. "Curing" of a paint is completion of polymerization with loss of the last remnants of the solvent. The "sniff test" is actually a good indicator.

There are, however, hybrid coatings that are mixtures of a polymerizing resin and a drying lacquer. These should be treated by the user as paint, and allowed to cure completely. Ironically, they sometimes take longer than an unmodified polymerizing coating.
 
Is a .3 tip and 30 psi good for a metallic paint, or should I use a bigger tip/needle?
Depends on the paint and how much it's been thinned, or reduced in viscosity. 30 psi seems much too high. Most of the airbrushes and paints I've used, the pressure is about half to maybe two thirds of that at most.
 
Metallics are the most difficult to spray because of the nature of the pigment, which is comprised of microscopic flakes. The paint has to remain sufficiently liquid on the surface for them to orient themselves parallel to the surface, but you don't want a heavy coat. Multiple thin coats, with sufficient reducer (thinning solvent) generally work best. I'd suggest something closer to a 1:1 ratio, but I'm not familiar with the paint you are using.

I forgot to mention that a 0.3 tip is probably good.
 
The smell test IS the best way to tell if enamel is fully cured, and it can take a few days
As for lacquer or any solvent-based paints, it cures within hours. Thinkness determines the time let it stand for a day will if in sought.
Pep
I completely agree with this statement. It is called off-gassing. I have done some guitar building and a very wise gentleman (one of the best custom guitar builders in the world) taught me this exact technique when finishing an instrument. Sniff it. If you can still smell it it's too soon for the next step.

David
 
I started over again 400 then 600 sanding then tried this light grey ceramic primer. The finish was smooth as glass. I thinned out some of the paint as suggested at 50/50 using lacquer thinner, and dropped air psi to 20. It went on much better that the first time using light coats.
Have 2 questions. The finish has more of a satin finish, Im going to give one more coat tomorrow. I will final coat it with high gloss clear aerosol, but I thought one of the benefits of an enamel is the high gloss it has.
2. This is an airbrush adjustment question; The adjusting knob on back of brush I figured out is a stop limit for the needle travel, which means paint flow, right? But in the middle of painting I wasnt getting any paint flow, I played around with the knob and got it working, but during cleaning I removed the needle to make sure it was clean and noticed another adjustable thumb screw just behind the air button. What is that for?


Write your reply...

Latest posts

Back
Top