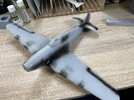
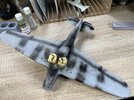
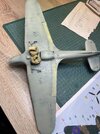
Hawker Hurricane IIB, Revell 1/32
- Thread starter BarryW
- Start date
BarryW
Well-Known Member
- Joined
- Apr 17, 2025
- Messages
- 126
BarryW
Well-Known Member
- Joined
- Apr 17, 2025
- Messages
- 126
I do have the Tornado IDS (Italari) in the stash Chris but as I recently built the GR3 it will be a while before I build it.yes it looks brilliant Barry comin on great an im followin on this great build just askin will you ever get back to fast jets again as i think you did some crackers in them
ATB
CHRISB
BOATMAN
Well-Known Member
- Joined
- Oct 7, 2024
- Messages
- 1,046
OK Barry yes i bought that GR3 like you built but it will be some time in the futcher when i build it but i will look forward to seein you build this other tornado an while im talkin to you sir can you tell me a good liquid filler that can be just sqirted in the cracks as on this phantom there are loads of cracks as a bit of a bad fit cheers sirI do have the Tornado IDS (Italari) in the stash Chris but as I recently built the GR3 it will be a while before I build it.
chrisb
BarryW
Well-Known Member
- Joined
- Apr 17, 2025
- Messages
- 126
I would use Vallejo Plastic Putty Chris for that.OK Barry yes i bought that GR3 like you built but it will be some time in the futcher when i build it but i will look forward to seein you build this other tornado an while im talkin to you sir can you tell me a good liquid filler that can be just sqirted in the cracks as on this phantom there are loads of cracks as a bit of a bad fit cheers sir
chrisb
BOATMAN
Well-Known Member
- Joined
- Oct 7, 2024
- Messages
- 1,046
thanks Barry ive ordered some an see how i get on cheers for the info sirI would use Vallejo Plastic Putty Chris for that.
chrisb
- Joined
- Sep 4, 2022
- Messages
- 2,637
... not built any aircraft, but I like the 'needle nose' applicator tip which helps applying it in tight spots!Vallejo Plastic Putty
Knock on wood, it hasn't appreciably dried out any either. In fact, after rinsing out the cap, and replacing it not completely dry, the next application a day later was a bit more 'fluid'.
- Joined
- Dec 1, 2024
- Messages
- 415
Barry, you have opened my eyes to this technique!Below is the preshading.
View attachment 147812
View attachment 147813
I then sprayed the Sky underside and achieved the effects I wanted. This is just the first stage of weathering.
View attachment 147811
Tomorrow I will review this and may make some adjustments. Sometimes it can look different the next day!!!
BarryW
Well-Known Member
- Joined
- Apr 17, 2025
- Messages
- 126
I will run through my usual painting process stage by stage with pictures. It is a multistage process.
The preshading works best with lighter colours though it does have some utility with darker colours as well. Consequently my process for the top camo is therefore very different.
Naturally I masked the underside areas that might catch overspray and, of course, a solid demarcation is needed between the Sky and top camo. The inside of the flaps had been painted grey-green and masked off.
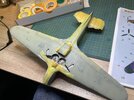
I start with the lighter of the two RAF camo colours, Dark Earth.
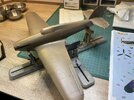
As you can see the pre shading is quite muted and subtle.
My next stage is to post-shade with RAF Light Earth. The object here is to replicate sun fade and lighter areas that would be caught by the sun. This time I focus on the inside of panels but, again this is important, not in a tidy orderly way, is not like doing a mottle camo. After this is how it looks.
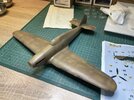
A bit 'spotty' but it's not finished here.
The next stage goes back to using Dark Earth, MRP paint does not need thinning normally but for this I use just a splash of Mr Levelling Thinner in the cup. I apply a series of mist coats, giving each coat time to dry before the next. This is to blend the different areas to create an overall organic natural look.
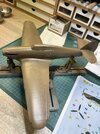
In the picture above it is difficult to see. But it is more visible in the wing close ups below.
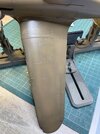
A couple of things about this approach.
1/ The effect will be more apparent under the final matt coat hence the need for being subtle.
2/ I use MRP lacquers and this technique works exceptionally well with lacquers. If you use water based paint it can work well with them as well but you would need to be more patient as they take longer to dry and, of course, need time to cure before masking over.
This is pretty much foolproof simply because by finishing with a series of mist coats the final effect is controllable.
Next I will be masking up over the Dark Earth ready for Dark Green. I will use exactly the same approach.
The preshading works best with lighter colours though it does have some utility with darker colours as well. Consequently my process for the top camo is therefore very different.
Naturally I masked the underside areas that might catch overspray and, of course, a solid demarcation is needed between the Sky and top camo. The inside of the flaps had been painted grey-green and masked off.

I start with the lighter of the two RAF camo colours, Dark Earth.

As you can see the pre shading is quite muted and subtle.
My next stage is to post-shade with RAF Light Earth. The object here is to replicate sun fade and lighter areas that would be caught by the sun. This time I focus on the inside of panels but, again this is important, not in a tidy orderly way, is not like doing a mottle camo. After this is how it looks.

A bit 'spotty' but it's not finished here.
The next stage goes back to using Dark Earth, MRP paint does not need thinning normally but for this I use just a splash of Mr Levelling Thinner in the cup. I apply a series of mist coats, giving each coat time to dry before the next. This is to blend the different areas to create an overall organic natural look.

In the picture above it is difficult to see. But it is more visible in the wing close ups below.

A couple of things about this approach.
1/ The effect will be more apparent under the final matt coat hence the need for being subtle.
2/ I use MRP lacquers and this technique works exceptionally well with lacquers. If you use water based paint it can work well with them as well but you would need to be more patient as they take longer to dry and, of course, need time to cure before masking over.
This is pretty much foolproof simply because by finishing with a series of mist coats the final effect is controllable.
Next I will be masking up over the Dark Earth ready for Dark Green. I will use exactly the same approach.
- Joined
- Dec 1, 2024
- Messages
- 415
Slightly off topic: Where did you get that painting stand?
BarryW
Well-Known Member
- Joined
- Apr 17, 2025
- Messages
- 126
Scale Model Shop. In fact I also have a better one now, delivered yesterday that I will be using later, delivered today. Watch this space.Slightly off topic: Where did you get that painting stand?
BOATMAN
Well-Known Member
- Joined
- Oct 7, 2024
- Messages
- 1,046
HI Barry well its lookin now like a hurrtcane now done an i wish i knew as much about what paints to use like you have shown but to complex for me but brillitly done you have sir you are a top grade moddeler very well doe so far be nice to see the green goin on her
chris
chris
BarryW
Well-Known Member
- Joined
- Apr 17, 2025
- Messages
- 126
There are four options for doing the second camo colour.
1/ freehand. This can work well to give a very soft demarcation. It is best for mottle type schemes though.
2/ Masking tape including 'curved' tape for a hard edge.
3/ Panzer Putty. I love this stuff and if you have time to apply it and do the paintwork in one session it's ideal.
4/ White tac snakes. This gives a soft edge between freehand and tape. This can be very effective specially when combined with my painting process.
I went for white tac snakes and then painted the dark green.
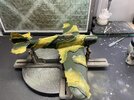
The post shading was with RAF light green and then the usual mist coats finished it off.
Masking tape removed
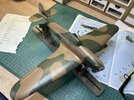
I am quite happy with that and have just six places that need some minor touching up. Two on the underside and four on the top camo. I will use the Panzer Putty to provide local masking when I do the touch ups, except in one place that needs a little masking tape.
One that's done I will be painting details which include black walk areas each side of the cockpit on the wing, the red gun patches and a sky fuselage band. All the above will be masked and sprayed. (Here are decals for the gun patches but
I much prefer to spray such details).
The outer wing guns will need to be hand brushed gunmetal.
I will then be ready to decal. I may or may not do a gloss varnish first given how smooth the MRP paints are.
1/ freehand. This can work well to give a very soft demarcation. It is best for mottle type schemes though.
2/ Masking tape including 'curved' tape for a hard edge.
3/ Panzer Putty. I love this stuff and if you have time to apply it and do the paintwork in one session it's ideal.
4/ White tac snakes. This gives a soft edge between freehand and tape. This can be very effective specially when combined with my painting process.
I went for white tac snakes and then painted the dark green.

The post shading was with RAF light green and then the usual mist coats finished it off.
Masking tape removed

I am quite happy with that and have just six places that need some minor touching up. Two on the underside and four on the top camo. I will use the Panzer Putty to provide local masking when I do the touch ups, except in one place that needs a little masking tape.
One that's done I will be painting details which include black walk areas each side of the cockpit on the wing, the red gun patches and a sky fuselage band. All the above will be masked and sprayed. (Here are decals for the gun patches but
I much prefer to spray such details).
The outer wing guns will need to be hand brushed gunmetal.
I will then be ready to decal. I may or may not do a gloss varnish first given how smooth the MRP paints are.
BOATMAN
Well-Known Member
- Joined
- Oct 7, 2024
- Messages
- 1,046
WELL ON THE WAY she is to lookin a top fghter of the B/B DONE MORE THAN THE SPITFIRE an a very good gun platform an your model Barry is really comin on an when you finish this sir any chance of seein that other tornado built ?????????? just hopein
chrisb
chrisb
AKRoast
Member
- Joined
- Oct 14, 2024
- Messages
- 89
Also on Amazon. Not super happy with mine.Slightly off topic: Where did you get that painting stand?
AKRoast
Member
- Joined
- Oct 14, 2024
- Messages
- 89
mainly because too small for 1/48 scale.Also on Amazon. Not super happy with mine.
BarryW
Well-Known Member
- Joined
- Apr 17, 2025
- Messages
- 126
I am using this jig with a 1/32 scale Hurricane. You can get jigs of different sizes.mainly because too small for 1/48 scale.
The one I have is good for both 1/32 and 1/48 but I doubt that it would work for 1/72, cannot be sure as I never build that scale.
Incidentally, see my review of the Flory Model jig which is good also for 1/32 and 1/48 and it blows all the other jigs I have had out of the water. I will be adding to that initial introduction to it in a few days.
BarryW
Well-Known Member
- Joined
- Apr 17, 2025
- Messages
- 126
I have completed the painting and next will have some decalling to do. I will often use paint masks for the main markings and (sometimes) for smaller markings because painting them looks better. In this one though I have decided to use the kit decals, while Revell certainly don't produce the best plastic as a rule their decals are among the best.
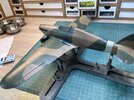
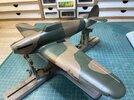
As you can see the MRP gives a nice sheen ideal for taking decals but I have decided to do some semi-gloss varnish to provide a barrier protecting the paintwork.


As you can see the MRP gives a nice sheen ideal for taking decals but I have decided to do some semi-gloss varnish to provide a barrier protecting the paintwork.

