Tiger I Russia summer 44 + crew

I am liking this model. The latest photo's show it off really well and the zimmerit actually looks better than I originally thought. Look forward to seeing the big cat finished.

Phil
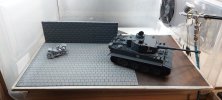
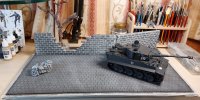
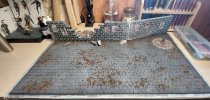
Hi Phil. I was a bit worried about using the zimmet but it went on better than expected. It's tacky rather than sticky so you can peel it off and redo if it's not looking good.

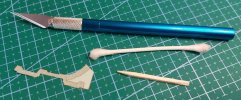
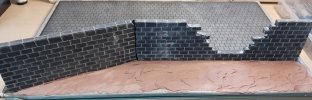
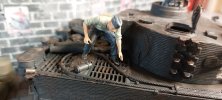
2 things to be aware of are make sure that the surface is clean, dust free and no fingerprints. Once applied you need to get any air out, I used a cotton bud for the main area's and a sharpened matchstick for the corners and creases.

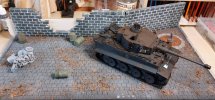
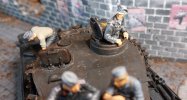
Still looked a bit rough but after applying 3 top coats and a varnish I was fairly happy with it. Definitely use it again and alot of spare left for mistakes and a smaller build in the future.
Pantherman
 

Attachments

  • 20230101_115243.jpg
    20230101_115243.jpg
    219 KB · Views: 1
I have just been doing a bit of research on the Tigers. It would appear Zimmerit paste was not used until July 1943 so any tanks made prior to this time did not feature zimmerit. Also, those air filters on the back of the tank were only on the very early model tigers and discontinued in 1943.
Question.....when you made the tank, can it be put together without those bulky air filters on the rear or would that be ill advised?

Phil
They can be left off, just fill the hole's on the hull early on, it's easier to get to. The kit offers several versions. I will scan the instructions and post them for you later.
Pantherman
 
Actually mate I think I got that wrong about the filters. It would seem the first few did not have the Feifel air cleaning system which was introduced in November 1942 and modified in March 1943. So with that in mind, I am happy to go with it as is and leave the zimmerit off. God when did I turn into a rivet counter.....LOL.

Phil
It creeps up on you. I started off wanting to get it absolutely right for my builds but then thought I'm just going to have fun and practice all sorts of methods and techniques for now, learn and practice then further along my modeling path do justice to an authentic build.
Pantherman
 
They can be left off, just fill the hole's on the hull early on, it's easier to get to. The kit offers several versions. I will scan the instructions and post them for you later.
Pantherman
Exhaust instructions as promised.
Pantherman
 

Attachments

  • 20230104_220704.jpg
    20230104_220704.jpg
    214.1 KB · Views: 4
  • 20230104_220632.jpg
    20230104_220632.jpg
    194.3 KB · Views: 4
  • 20230104_220709.jpg
    20230104_220709.jpg
    142.6 KB · Views: 4
They can be left off, just fill the hole's on the hull early on, it's easier to get to. The kit offers several versions. I will scan the instructions and post them for you later.
Pantherman
Paint and decal instructions as promised.
I went with 213 Russia 43.
Pantherman.
 

Attachments

  • 20230104_220426.jpg
    20230104_220426.jpg
    225.4 KB · Views: 3
  • 20230104_220448.jpg
    20230104_220448.jpg
    233.5 KB · Views: 3
  • 20230104_220504.jpg
    20230104_220504.jpg
    240 KB · Views: 2
  • 20230104_220531.jpg
    20230104_220531.jpg
    333.9 KB · Views: 2
  • 20230104_220613.jpg
    20230104_220613.jpg
    284.8 KB · Views: 2
  • 20230104_220545.jpg
    20230104_220545.jpg
    130.5 KB · Views: 2
  • 20230104_220556.jpg
    20230104_220556.jpg
    148.5 KB · Views: 3
It creeps up on you. I started off wanting to get it absolutely right for my builds but then thought I'm just going to have fun and practice all sorts of methods and techniques for now, learn and practice then further along my modeling path do justice to an authentic build.
Pantherman
Very sound advice my man and thanks for those instructions.

Phil
 
Fair enough. I do assemble arms and body before painting. Let us know how you find painting a complete assembly. I think the commander looks ok...a bit wooden perhaps. Have you looked at Alpine figures. I can't think of a particular one off the top of my head but they have a lot to choose from.

Phil
Hi Phil. Thought I would update you on the figure painting as promised, it does take much longer if the figures are finished rather than painting limb by limb. I have just bought some fine mini saw blades to try sculpt the hands on my next victim as all my figures look like they are wearing gloves!

I am also trying to mask and spray the flesh parts on a spare victim. I'm using tape on this one but was wondering if anyone has used liquid mask to do this ? Would welcome any help or info on this.

So to sum up I think I will be painting figures in part's rather than built.
Pantherman
 

Attachments

  • 20230105_223850.jpg
    20230105_223850.jpg
    206.7 KB · Views: 6
  • 20230105_223812.jpg
    20230105_223812.jpg
    117.7 KB · Views: 6
  • 20230105_223842.jpg
    20230105_223842.jpg
    131.8 KB · Views: 6
Yeah, I'm not surprised about the commander figure. I think that kit hasn't changed since I built it when I was in high school (graduated in 1982). So the figures are Tamiya's old figures, made with the old (classic) process. In their newer kits, they use 3D sculpting and 3D imaging of live models to produce their masters. Tamiya's newer figures look more like contemporary resin figures, because their detail is so much finer. I still like Tamiya's earlier figures, but I recognize that they can use some work to look better.
 
Thanks for the figure painting update. Mate, I really love looking at figure's that are painted well such as we see from Steve Ski on this forum, but I am actually quite petrified when it comes to doing them or more correctly, doing the face. As a rule I completely assemble any figure except the head. That way I can fill any gaps which you usually get joining arms to the body. I always paint the face and hands first (and yes I agree, they all look like they are wearing gloves). I have tried oils but so far I have not been happy with the result. I need to buy a flesh colored oil paint so I can use it as my base color before I try oils again. I grabbed a few close up images of 1/35 scale figures that I thought were really well done and when it comes time to do my figures I punch one of these up on the computer and try my best to emulate it. Sometimes it works and sometimes it doesn't, but you will be amazed at the variety of colors some of the Pro's do when it come to lighting and shading of figures and not just on the face or hands.
As for using tape....sorry mate never done it so can't help.

Phil
 
So the main build is done and now sprayed with matt varnish all ready for weathering, figures and base.
Should take about a month but will keep you all updated as I go.
Pantherman
So I have made a start on the diorama, still not sure of the final look so it's going to be alot of moving things around as I go to see what looks like it's supposed to be there.

First time I've made cobbles and block walls. Hadn't realised just how long that takes and I haven't even started the weathering on them.
Pantherman
 

Attachments

  • 20230119_195046.jpg
    20230119_195046.jpg
    180.2 KB · Views: 7
  • 20230121_131712.jpg
    20230121_131712.jpg
    230.5 KB · Views: 7
  • 20230121_132618.jpg
    20230121_132618.jpg
    208.7 KB · Views: 7
  • 20230121_131825.jpg
    20230121_131825.jpg
    244 KB · Views: 7
Hey Pantherman, call me seriously tardy, cause I am, but this is pluggin along nicely. Bookmarked.

I've been sniffin a lot of paint lately and my tracking of progress by others has been lacking, my bad. You asked if anyone has used masking fluid on figures. I have not, but if I can add some input I'll expand on my personal experience.

I see you've got that fig taped up and that will work for what you're doing, but masking putty or fluid would work just as well, if not better, imho. Personally, I think the fluid would be the better option and may be easier than masking putty to remove. If you paint a figure that has gear already attached the fluid would be easier to remove with a tooth pick or a rubber tipped tool. I would suggest a trial run, see what works best and Ruck On from there.

I have never used an airbrush for painting figures, though I know a lot of guys do. Frankly, for me, it's way more time consuming which involves clean-up, etc., etc. I always start with a primer coat, then acrylic base tones, then oils, and the face/head is always done first, then work my way down the figure.

This is looking good, so whatever you decide, have fun "sniffin paint and gluin them fingers together"! Cheers, Ski.
Thanks for the masking putty tip, I will give it a try on a random figure to see how that works out.

I have been doing a bit more on the tiger base and will post some updates shortly.

Been using the tamiya extra thin quick set recently and that stuff really stinks so I will lay off the sniffin for the time being!
Pantherman
Quick update on progress as promised. Just an idea of what I'm aiming for.
Lot's of weathering and finish on the tiger still to do. Got to paint the bike and finish painting the figures, all 10 of them.
Still alot of work on the base cobbles and wall.
Probably another 3 weeks should have it done possibly. I will post a completed set of photos when it's done.
Pantherman
 

Attachments

  • 20230125_210734.jpg
    20230125_210734.jpg
    311.9 KB · Views: 7
  • 20230129_092527.jpg
    20230129_092527.jpg
    188.6 KB · Views: 7
  • 20230130_215549.jpg
    20230130_215549.jpg
    294.9 KB · Views: 7
  • 20230130_215636.jpg
    20230130_215636.jpg
    369.8 KB · Views: 8
Quick update on progress as promised. Just an idea of what I'm aiming for.
Lot's of weathering and finish on the tiger still to do. Got to paint the bike and finish painting the figures, all 10 of them.
Still alot of work on the base cobbles and wall.
Probably another 3 weeks should have it done possibly. I will post a completed set of photos when it's done.
Pantherman
Have done a little more on the base. Working on the 2 crews this weekend so it's starting to come together.
Pantherman
 

Attachments

  • 20230204_124741.jpg
    20230204_124741.jpg
    285.2 KB · Views: 3
  • 20230204_124807.jpg
    20230204_124807.jpg
    256.3 KB · Views: 3
Have done a little more on the base. Working on the 2 crews this weekend so it's starting to come together.
Pantherman
Tiger crew are done and in position. Just got to add a fuel hose to the lad at the rear.

When I have done the bike and crew I will put it all together in the diorama and matt coat everything.

Should post the last photos in a couple of weeks. Stay tuned. Happy for all comments, good and bad before I spray the final coat.
Pantherman
 

Attachments

  • 20230207_213607.jpg
    20230207_213607.jpg
    292.1 KB · Views: 11
  • 20230207_213614.jpg
    20230207_213614.jpg
    174.5 KB · Views: 11
  • 20230207_213713.jpg
    20230207_213713.jpg
    198.2 KB · Views: 10

Latest posts

Back
Top