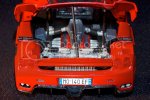
Enzo Ferrari: The Body Challenge

scaledale

New Member
Joined
Nov 23, 2012
Messages
91
I'm working on a Revell Enzo Ferrarri that has eight or so seperate parts that all need to be body color. I thought about assembling the body first but decided to paint all the parts separately. This is where I am in the build process right now.

After initial priming and an undercoat of black, it needed a bit of sanding to clean things up.
8447611497_35c3d61558.jpg


I masked the underside with yellow and green frog tape and used plugs of clay to fill the curved openings of the lights and vents in the body.
8447616369_18801459a0.jpg


Here is the finished mask job ready for the second coat of primer and the first coat of Tamiya Italian Red from a can.
8448708276_2d74e54866.jpg


Looks like this at the moment. I may use my air brush for the next coat to be sure I get in the cracks and seams of the body.
8448708482_d49275799f.jpg


I'll show the engine work later.

ScaleDale
 
Here is an update on my project.
I gave the body a coat of Tamiya X-7 red with my airbrush to make sure the cracks and creases of the body got a good dose of color. It's a bit rough so I will smooth it with 2000 grit sandpaper before I add a wet coat of Italian Red.
8453510125_b56c4aecce.jpg

Here's some of the engine work done so far.
12 cylinders of styrene power!
8448700572_486cb34ed4.jpg

8447615437_4614441ff0.jpg

8448703158_8d0126cd85.jpg


Packed in the chassis.
8453518691_8d88f72882.jpg

I'm trying to detail it as best as I can, and I think it's turning out good. The odd stuff on the carpet area is black flocking (embossing powder) being used to imitate carpet. My first try with this, so it's a bit off.

Scaledale
 
Tamiya spit on my ferrari... I sprayed what I hoped would be the final coat on my Enzo and the can of Italian Red spit on my car! I had to sand down the paint spots this morning and I'm going to finish it with an airbrush and some diluted Humbrol 220 (Italian Red).

Tomorrow...

Dale
 
Trashed my finish coat... got everything airbrushed and dropped the box containing the main body while messing with the door and it fell in a pile of pine needles. A quick dunk in a big jar of mineral spirits seemed to have washed off all of the messed up Humbrol enamel while not damaging the Tamiya lacquer I was trying to finish. It's sitting under cover in my spray booth right now and I hope I can salvage it with a bit of sandpaper and a more steady hand.

Dale
 
If not dunk it in the purple pond and start the process all over again ha ha. Hope it works out for ya bud and you can salvage what you have to this point.
 
hooterville75 said:
If not dunk it in the purple pond and start the process all over again ha ha. Hope it works out for ya bud and you can salvage what you have to this point.

Actually, it worked out better than I thought. The paint was still wet when I dunked it in the mineral spirits and all of the gunk just washed off. I had put enamel over well cured laquer and the solvent didn't bother the undercoat at all. I finished sanding and prepping tonight and will finish coat it tomorrow. I have some good auto scratch remover and polish to bring out the shine. The body looks good enough that I could probably get away without any more paint, but the point of this build is to have a great finish to a difficult body.

Dale
 
Wanted to do an update on this as I need to get it done before I start on my contest build. I asked over in the Paint section for advice on gluing clear parts and was directed to Guerrilla Grip but couldn't find it. I used Weldbond from my local craft store and it worked out OK. The photo shows it wet and after setting overnight in my dehydrator. It worked well enough enough to build clear body side and tail lights after two of the original parts were attacked by rogue "helping hand" tweezers and vanished in the jungle of my carpet for their own safety...
8497412053_b8e29ce99c_z.jpg

Much thanks to the Dr. Cranky polishing video for the techniques to remove crap from paint.

Dale
 
Thanks. I'm in the process of sealing the body down to the chassis now. It's a tight fit with all of the Supercars. Airtight. After I mask and trim the lower edge of the body where it mates to the frame I will be done and will post more photos.

Dale
 
Finished! Not bad considering that not too long ago it was belly up and wet in a pile of pine needles in my garage!
I adjusted the suspension down to level it out and lower the stance to make it look more like it's on the prowl and the effect is pretty good. I followed Dr. Cranky to sand/polish/wax and finish the paint. I used 4000 grit sandpaper, the finest I could find, Meguiar's X2 Scratch Remover and two of the Zymol car products. A wax and detailing spray. The engine cover wouldn't stay down so I sealed the rear compartment with tacky tape for the photos.

8508723224_7fa9897fdb_z.jpg


8508765198_d57c965589_z.jpg


8507628959_8fd771c585_z.jpg


8507639811_e647b5a7b2_z.jpg


8507684581_dd7fd9b9c5_z.jpg


Thanks

Dale: G/T Engineering
 
I don't think the forum reads my flickr account for the Update flag, so here is a try from Photo Bucket.
EnzoMotor_zps92d1f74e.jpg

Dale
 
billb said:
Geeze the Enzo is a fantastic looking piece of machinery.
& you've captured it beautifully :)

Thanks. When I finish with my contest build I'm going to make it my first weathering build and take it mudding!

Dale
 

Latest posts

Back
Top