Weathering a GE 70 Tonner (Locomotive)

iandrewmartin

Active Member
Joined
Jan 19, 2013
Messages
103
So;
It's been a while since my last post. Work gets in the way of so much fun.

This model is an H0 Scale (1:87th) Bachmann GE 70 Tonner, one of two that I bought, back in 2006. This is the first locomotive that I've weathered. I've done lots of freight cars, but it took me some time to work my way up to doing this locomotive.

All weathering is oil paints, applied using a make-up sponge technique, including dry-sponging. Inspired by watching Night Shift's channel on youtube. And some goofing around (is there a better way to learn?).

There's maybe a little more work to do if I really feel like it, on the front and the rear pilot, to get some crud there thrown up from the track by freight car wheels, but really I'm just nit-picking at this point. For everyday use on a layout, she is done.

To the photos:
Driver's Side:
1: Lit from above (like on the layout)
2: Side lit to show all of the underbody weathering
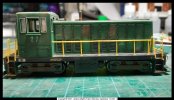
onner_2021-09-13_weathering_driver_side_layout_lit.jpg
ner_2021-09-13_oil_weathering_driver_side_side_lit.jpg


Conductor's Side:
1: Lit from above (like on the layout)
2: Side lit to show all of the underbody weathering
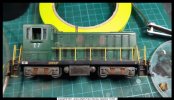
nner_20210-9-13_weathering_conductor_side_side_lit.jpg
nner_2021-09-13_weathering_condustor_side_side_lit.jpg

I know I don't post much, just too tired after work to get online and post most days. I hope that you are all well, and very thankful to be a part of this site. I'd like to thank you all for your inspiration.

Question for you though: How do you all get rid of the dust and such on your models. I cleaned this well (I thought) until I looked at the photos and saw all of the dust and crud there.
Andrew Martin
Bolt tightener & spike driver at Andrew's Trains
Small layout design blog: huntervalleylines.wordpress.com/
Modelling pages: martinfamilyweb.wordpress.com/family/andrew/modelling/
 
Good to see you're still kicking !

As far as the dust - yeah , it never fails to show up in photos even if you think you've removed it all .
I use a couple of different brushes and / or air from the airbrush ( or my lips :D ) to knock it off . Gotta be careful of small parts of course .
Stubborn little specks can be removed by dabbing them up with a moist swab . I use those various sizes from Tamiya .
 
For my 1:25 and 1:35 scale kits, I bought a display case with 16 places for models. I think I paid $80-$90 for it
 
Good to see you're still kicking !

As far as the dust - yeah , it never fails to show up in photos even if you think you've removed it all .
I use a couple of different brushes and / or air from the airbrush ( or my lips :D ) to knock it off . Gotta be careful of small parts of course .
Stubborn little specks can be removed by dabbing them up with a moist swab . I use those various sizes from Tamiya .
Moist swabs might be the best option on this one. She's kind of small.

Thanks for your help!
 
I just found out a Cat 1 hurricane is about to move right over me .
:D Yay
Teach me to stop watching it . Thought it was supposed to weaken and move inland to my west .
It took a hard right just off the coast . Ooops .
This will be interesting .
 
I just found out a Cat 1 hurricane is about to move right over me .
:D Yay
Teach me to stop watching it . Thought it was supposed to weaken and move inland to my west .
It took a hard right just off the coast . Ooops .
This will be interesting .
Be careful. Watching the results of the Hurricane through New Orleans bought back memories from my time in Austin (I worked at the Airport) watching C5 after C5 bring in the displaced from N.O. during Katrina.

Stay safe, and dry and hopefully, you'll be OK.
 
It just made landfall about 30 minutes ago .
Getting loud outside ! I usually sleep through these things :D
I graduated high school up in Austin , BTW .
 
Westlake , in '85

can't believe I still have power -- it keeps cutting out for half a minute or 2 and comes back on .
I'll be quite shocked if it doesn't go out for good .
The center will probably be on top of me in the next hour or so .
 
Got thru that pretty much completely unscathed .
Power and internet still on and not a lot of limbs down -- only small , rotten limbs , about what you'd expect from a big thunderstorm . Doesn't look like a Cat-1 just went right over us .
I hear a chainsaw running to the east of me , so I assume someone has a tree down , or 2 .
Back to building models ! . :D
 
So;
It's been a while since my last post. Work gets in the way of so much fun.

This model is an H0 Scale (1:87th) Bachmann GE 70 Tonner, one of two that I bought, back in 2006. This is the first locomotive that I've weathered. I've done lots of freight cars, but it took me some time to work my way up to doing this locomotive.

All weathering is oil paints, applied using a make-up sponge technique, including dry-sponging. Inspired by watching Night Shift's channel on youtube. And some goofing around (is there a better way to learn?).

There's maybe a little more work to do if I really feel like it, on the front and the rear pilot, to get some crud there thrown up from the track by freight car wheels, but really I'm just nit-picking at this point. For everyday use on a layout, she is done.

To the photos:
Driver's Side:
1: Lit from above (like on the layout)
2: Side lit to show all of the underbody weathering
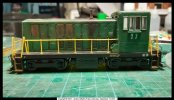
View attachment 87743
View attachment 87744


Conductor's Side:
1: Lit from above (like on the layout)
2: Side lit to show all of the underbody weathering
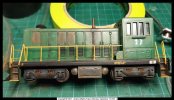
View attachment 87745
View attachment 87746

I know I don't post much, just too tired after work to get online and post most days. I hope that you are all well, and very thankful to be a part of this site. I'd like to thank you all for your inspiration.

Question for you though: How do you all get rid of the dust and such on your models. I cleaned this well (I thought) until I looked at the photos and saw all of the dust and crud there.
Looks great I like the weathing on the wheels and springs. Do you build track layouts as well??
Andrew Martin
Bolt tightener & spike driver at Andrew's Trains
Small layout design blog: huntervalleylines.wordpress.com/
Modelling pages: martinfamilyweb.wordpress.com/family/andrew/modelling/
 
pro wrote: Looks great I like the weathering on the wheels and springs. Do you build track layouts as well??

Thanks, I'm glad you liked the weathering. I find that working in the industry as a driver, makes it a lot easier to access, photograph and understand how and why weathering happens.

And yes I do build layouts when I get the time. However, long days and exhaustion do not a layout build enable! Although I am working on finishing my latest layout at the moment.Some minor problems, but I'm working to resolve that in fits and starts. You can see more about that on my layout blog here: huntervalleylines.wordpress.com/

All the best
Andrew
 
For dust, I do like Momo-soft brushes, like make-up brushes, and air under pressure. I've used my airbrush at the lowest possible setting, but also cans of compressed air for cleaning keyboards or other pieces of hardware.
Also, I'm gradually putting things in display cases, glass watch domes, etc, things like that.

What is next on my list of things to get is a display case. For the most part, they go back into their box when not in use, otherwise, they are on a layout, doing some switching. So they get a little dirty because of that. Just looks very bad in the eye of the camera. Thanks for your information.
 
So;
It's been a while since my last post. Work gets in the way of so much fun.

This model is an H0 Scale (1:87th) Bachmann GE 70 Tonner, one of two that I bought, back in 2006. This is the first locomotive that I've weathered. I've done lots of freight cars, but it took me some time to work my way up to doing this locomotive.

All weathering is oil paints, applied using a make-up sponge technique, including dry-sponging. Inspired by watching Night Shift's channel on youtube. And some goofing around (is there a better way to learn?).

There's maybe a little more work to do if I really feel like it, on the front and the rear pilot, to get some crud there thrown up from the track by freight car wheels, but really I'm just nit-picking at this point. For everyday use on a layout, she is done.

To the photos:
Driver's Side:
1: Lit from above (like on the layout)
2: Side lit to show all of the underbody weathering

View attachment 87743
View attachment 87744


Conductor's Side:
1: Lit from above (like on the layout)
2: Side lit to show all of the underbody weathering

View attachment 87745
View attachment 87746

I know I don't post much, just too tired after work to get online and post most days. I hope that you are all well, and very thankful to be a part of this site. I'd like to thank you all for your inspiration.

Question for you though: How do you all get rid of the dust and such on your models. I cleaned this well (I thought) until I looked at the photos and saw all of the dust and crud there.
Andrew Martin
Bolt tightener & spike driver at Andrew's Trains
Small layout design blog: huntervalleylines.wordpress.com/
Modelling pages: martinfamilyweb.wordpress.com/family/andrew/modelling/
Looks great
 

Latest posts

Back
Top