USMC M4A2 – 2 nd Pt. / C Co. / 1st CTB – “Galvanic†Op.
") Hi guys,
Hi guys,
Some months ago I decided to give my first go to a modern kit (truly modern mould, year 2.006 or so kit, not like the very old ones - 1970´s - that I took as calisthenics in my return to modelling). So I picked Dragon M4A2 Tarawa (ref kit 6062) after reading a little in PMMS site.
After that, I´ve readen specifically a little about the Shermans involvement in Galvanic Op. A very short op, with limited armor support, and great difficulties.
All the Shermans story in that Op is more or less well documented. As far as I know, only the fate of two of the tanks from the 2nd platoon allows “to play†with imagination (very, very little playing, really). So decided to build one of these two Shermans.
The ORBAT of the C Co. (1st Corps Tank Battalion), wich was the one deployed in the direct amphibious assault to Betio island, had the names of all of its tanks beginning with the letter “Câ€â€¦ as we can see in the next table ( a “ ? “ means name unknown):
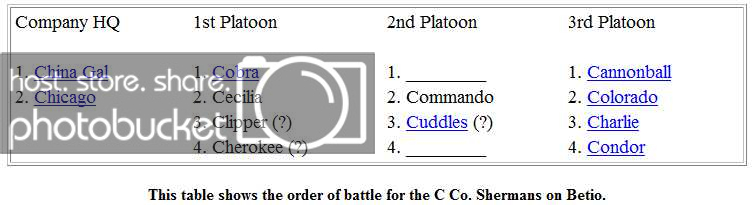
Because of the “C-name-beginning rule†and the unknown names, I´ve decided to name the M4A2 that I´m currently building “Charon†(Charon was the ferryman to Hades, in Greek mithology)
So that´s the matter... Tarawa, Nov. 1.943…
As I said, I began to build the model a few months ago, at a really very slow pace, because as I was finishing the SU122 and the Ford GPA. The model:


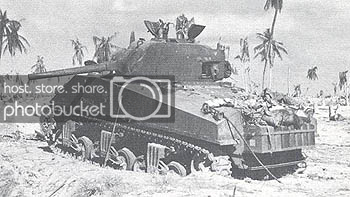
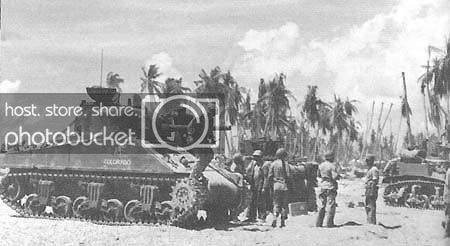
Here are a few Sherman photos that I´ve been able to pick from the www during ops in Tarawa…


The kit is very good to me, but definitely not a kit for an absolute-first-time beginner. Fortunately, it is not my case. It has been really an easy build for me.
By the way, the kit lacks some prominent features shown by the M4A2 in Tarawa, but I think that the matter can be VERY easily corrected. Those features are:
1.- Rear rack for eight (8) US jerrycans.
2.- Exhausts deflector.
Then: how have I solved those issues:
1.- For the rear rack I´ve built it used the ubiquitous Evergreen, and the excellent diamond shape medium size mesh from ROYAL MODEL (be-a-u-ti-ful). I´ve not been able to find neither a conclusive nor good resolution photo of this specific “Tarawa rackâ€, so I´ve built it like I would have done to hold a weight of more or less 180 kg / 370 lbs and not drilling the rear plate.
2.- For the exhausts deflector, I´ve used the kit that made FORMATIONS, now (recently) closed. I believe that my order must have been one of the latest ones served by Robert… It´s a pity that Formations has closed… it filled a specific market gap…
Some additional notes:
a.- All the small chains are homemade twisting a tiny wire made of a very soft alloy (not lead, but a very soft alloy), then pressing the so twisted wire with a flat-end plier. Well, they are not like the good PE ones, but they do their work for me.
b.- The replacement caps for the headlights and their side mount are made from plastic from the kit´s sprues and Evergreen.
c.- All the hatches are workable, this has been a whim…
d.- I really HATE that hull mounted MGs that dont move, so I´ve built a ball-joint using the extreme of one of the wider sprues that came with the kit, hollowed it, then hollowed the first (inner) part of the hull MG barrel, and used a dressmaking pin whose head was a perfectly spheric one. If I don’t forget, I´ll draw a croquis. After all of this, and getting a workable hull MG, I´ve empirically arrived to the conclusion that this weapon was ALMOST USELESS, being far, FAR superior the German MG ball mounts… being one of the main cause the fact that the Sherman ones didn´t had ANY optic aiming device, this added to the poor freedom that this system gives to the weapon.
Here are some pics I´ve taken today (09 October) of the currently state of the model. I´ve been working over it at intervals during this week (last week I was slowly advancing . As you can see, the building phase is almost finished.
Well, I know that this is not a greatly assorted photo-report, but I hope you like it. so Fire For Effect:


And I hope this post will help to prove that I´m not shirking around here... ! ;D ;D
And again, sorry about my english!
See you,
RG
Hi guys, Some months ago I decided to give my first go to a modern kit (truly modern mould, year 2.006 or so kit, not like the very old ones - 1970´s - that I took as calisthenics in my return to modelling). So I picked Dragon M4A2 Tarawa (ref kit 6062) after reading a little in PMMS site.
After that, I´ve readen specifically a little about the Shermans involvement in Galvanic Op. A very short op, with limited armor support, and great difficulties.
All the Shermans story in that Op is more or less well documented. As far as I know, only the fate of two of the tanks from the 2nd platoon allows “to play†with imagination (very, very little playing, really). So decided to build one of these two Shermans.
The ORBAT of the C Co. (1st Corps Tank Battalion), wich was the one deployed in the direct amphibious assault to Betio island, had the names of all of its tanks beginning with the letter “Câ€â€¦ as we can see in the next table ( a “ ? “ means name unknown):
Because of the “C-name-beginning rule†and the unknown names, I´ve decided to name the M4A2 that I´m currently building “Charon†(Charon was the ferryman to Hades, in Greek mithology)
So that´s the matter... Tarawa, Nov. 1.943…
As I said, I began to build the model a few months ago, at a really very slow pace, because as I was finishing the SU122 and the Ford GPA. The model:
Here are a few Sherman photos that I´ve been able to pick from the www during ops in Tarawa…
The kit is very good to me, but definitely not a kit for an absolute-first-time beginner. Fortunately, it is not my case. It has been really an easy build for me.
By the way, the kit lacks some prominent features shown by the M4A2 in Tarawa, but I think that the matter can be VERY easily corrected. Those features are:
1.- Rear rack for eight (8) US jerrycans.
2.- Exhausts deflector.
Then: how have I solved those issues:
1.- For the rear rack I´ve built it used the ubiquitous Evergreen, and the excellent diamond shape medium size mesh from ROYAL MODEL (be-a-u-ti-ful). I´ve not been able to find neither a conclusive nor good resolution photo of this specific “Tarawa rackâ€, so I´ve built it like I would have done to hold a weight of more or less 180 kg / 370 lbs and not drilling the rear plate.
2.- For the exhausts deflector, I´ve used the kit that made FORMATIONS, now (recently) closed. I believe that my order must have been one of the latest ones served by Robert… It´s a pity that Formations has closed… it filled a specific market gap…
Some additional notes:
a.- All the small chains are homemade twisting a tiny wire made of a very soft alloy (not lead, but a very soft alloy), then pressing the so twisted wire with a flat-end plier. Well, they are not like the good PE ones, but they do their work for me.
b.- The replacement caps for the headlights and their side mount are made from plastic from the kit´s sprues and Evergreen.
c.- All the hatches are workable, this has been a whim…
d.- I really HATE that hull mounted MGs that dont move, so I´ve built a ball-joint using the extreme of one of the wider sprues that came with the kit, hollowed it, then hollowed the first (inner) part of the hull MG barrel, and used a dressmaking pin whose head was a perfectly spheric one. If I don’t forget, I´ll draw a croquis. After all of this, and getting a workable hull MG, I´ve empirically arrived to the conclusion that this weapon was ALMOST USELESS, being far, FAR superior the German MG ball mounts… being one of the main cause the fact that the Sherman ones didn´t had ANY optic aiming device, this added to the poor freedom that this system gives to the weapon.
Here are some pics I´ve taken today (09 October) of the currently state of the model. I´ve been working over it at intervals during this week (last week I was slowly advancing . As you can see, the building phase is almost finished.
Well, I know that this is not a greatly assorted photo-report, but I hope you like it.
so Fire For Effect:
And I hope this post will help to prove that I´m not shirking around here... ! ;D ;D
And again, sorry about my english!
See you,
RG