Sith Cosplay Armor Mk2

Quaralane

Well-Known Member
Joined
May 22, 2009
Messages
11,257
Bringing this one back from the great beyond.

Working on a new version of my previous Sith Armor cosplay.
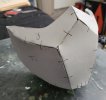
This time, I'm using Sintra rather than EVA foam.

Started the new armor base in 1/4" Sintra versus the older version being in 1/2" EVA foam
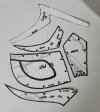
Layouts started, based on the older piece
sith-armor-mk2-01.jpg

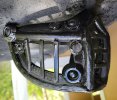
For the bracers, I'm basing the detail on bracers worn by Therion Jinn in Star Wars: The Old Republic
sith-armor-mk2-02.jpg

Finished laying out the new chest piece.
This version won't have the center plate of the original
sith-armor-mk2-03.jpg

Base piece cut out.
This was done with a LOT of passes using a box cutter
sith-armor-mk2-04.jpg

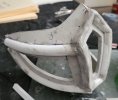
I laid out the pieces for the arms and legs, and then cut them out with a jig saw. Saved a LOT of time and work doing that
sith-armor-mk2-05.jpg
sith-armor-mk2-06.jpg
sith-armor-mk2-07.jpg
sith-armor-mk2-08.jpg
 
Began heatforming with the chest piece, and then went to the bracers and leg pieces.
While Sintra can be heated and formed with a heat gun, you need to use patience, and a respirator is a good idea because of the fumes
sith-armor-mk2-09.jpg
sith-armor-mk2-10.jpg

sith-armor-mk2-11.jpg

Laid out the detail pieces for the bracers on construction paper, and then laid it out onto 1/8" Sintra
sith-armor-mk2-12.jpg

I cut new angles into the chest piece for a different, less square look
sith-armor-mk2-13.jpg
sith-armor-mk2-14.jpg

Due to the stiffness of the Sintra, I had to rework my idea on how to fit the bracers.
I wound up having to cut about 1/4" from either side of the under seam to allow for my thumbs to make it through the piece
sith-armor-mk2-15.jpg
 
Laid out new angled shoulder covers to add to the main piece. This was part of why I made the angle cuts on the chest piece
sith-armor-mk2-16.jpg

Tested the layout of the detail pieces on the bracers
sith-armor-mk2-17.jpg

And now, the gluing begins. I'm using E6000, which is the adhesive of choice for the 501st Legion and the Mandalorian Mercs when working with Sintra.
I'll reinforce these later with Chicago screws.
Here are the bracers and the beginning of the chest all clamped up
sith-armor-mk2-18.jpg
sith-armor-mk2-19.jpg

 
Got the banding/clamps off on the chest and bracers.
Also installed the Chicago screws that will be doing the main work of holding the pieces together.
Chest piece
sith-armor-mk2-20.jpg
Bracers
sith-armor-mk2-21.jpg

For the underside of the bracers, I used two layers of 2mm EVA foam.
I used my soldering iron to cut 'pad' lines in the first layer prior to gluing them together.
I then glued them to the main parts.
sith-armor-mk2-22.jpg

Decided to show a little comparison between the Mk1 and Mk2 sections so far.
This is mostly to show the differences in what I can do now
Chest piece
sith-armor-mk2-23.jpg
Bracers
sith-armor-mk2-24.jpg

Turning my attention to the leg pieces, I cut them using similar methods to what I used for the arms and then heat formed them.
I also added a 'center line' to use for placing the detail pieces
sith-armor-mk2-25.jpg

Laid out a template for the leg detail pieces, then separated the segments for cutting
sith-armor-mk2-26.jpg
sith-armor-mk2-27.jpg

Laid out the templates on the 1/8" Sintra and then cut them out
sith-armor-mk2-28.jpg

I heat formed the detail pieces, and then labeled them to make sure they get applied in the correct order to the correct leg
sith-armor-mk2-29.jpg
 
Using hot glue, I mounted 1" webbing to the 4 and 2 pieces of the detail layer.
I'll add the buckles to them after I get it all mounted to the leg pieces
sith-armor-mk2-30.jpg
sith-armor-mk2-31.jpg

Glued the 4, 3, and 2 pieces to the leg forms using more of the E6000 I'd used previously.
I also got the 4 and 3 pieces secured with Chicago screws
sith-armor-mk2-33.jpg

 
Got the legs out of the clamps, and installed the strapping and Chicago screws
sith-armor-mk2-34.jpg

Drew up a templat for the new 'spats' for covering my shoes.
This one is designed to go over both sides of the foot with armor plating over the top
sith-armor-mk2-35.jpg

Pieces for the spats cut from 3mm Sintra.
I used my Dremel to cut grooves in the top pieces for ease of later assembly
sith-armor-mk2-36.jpg

Pieces shown how they'll sit after heatforming
sith-armor-mk2-37.jpg
sith-armor-mk2-38.jpg

Drew up a template for the knee plates
sith-armor-mk2-39.jpg

Cut the layers from more 3mm Sintra
sith-armor-mk2-40.jpg

Finished knee plates, awaiting straps
sith-armor-mk2-41.jpg
 
With all of the parts now built, I decided to go ahead and paint them up.
I started by coating the craft foam on the arms with Plasti-Dip
Then, I primered all of the parts with black primer.
I masked off the detail plates and painted them with Testors Graphite Dust lacquer.
Once the masking was removed, I hand painted the black areas between the plates
sith-armor-mk2-42.jpg
sith-armor-mk2-43.jpg
sith-armor-mk2-44.jpg
sith-armor-mk2-45.jpg

 
Installed some 1/2" strips of elastic on the 'spat' pieces that will be covering my shoes.
This will keep the pieces from moving as I walk around the con
sith-armor-mk2-46.jpg

For the knee pieces, I opted to use 1" elastic
sith-armor-mk2-47.jpg
These will be adjustable during the day by using velcro for the closures
sith-armor-mk2-48.jpg

At this point, the armor is done.
For the first time, I put on the full suit I'll be wearing at Salt Lake Comic Con in September.

A look at the upper body
sith-armor-mk2-49.jpg
sith-armor-mk2-50.jpg

A look at the leg sections
sith-armor-mk2-51.jpg
sith-armor-mk2-52.jpg

The whole suit, complete with saber
sith-armor-mk2-53.jpg
sith-armor-mk2-54.jpg

Finally, a side by side comparison with the Mk1
sith-armor-mk2-55.jpg

 
After some thought, it was time to make the necessary adjustments to the 2.0 version of the Sith Armor.
I also made a couple of changes to how things were going to work.

The original pieces, prior to modification
LtTim3s.jpg

The plan was to cut a bit of length off the bracers so I had full arm movement.
Having gotten actual boots for this suit, I cut the main leg pieces down so it was primarily the armor.
The belt got some of the biggest changes as I took it from a single belt to a double and intended to add spacers as well as a new back plate for the buckle.
Egb2gUP.jpg
XbSilDy.jpg

With the belt now finished up, I replaced the old version's tool pouches with a single utility pouch.
Went in on the buckle and painted the engraved design in Tamiya red.
Seeing how that turned out, I made similar markings on the bracers and chest piece.
I also changed out the gloves for ones that let me better grip the sabers.
3WPtdVA.jpg
kZFBS0y.jpg
Y0TgMok.jpg

After putting on the full costume, I decided to drop both the knee pieces and the 'spats' I'd been wearing to hide the fact I was wearing shoes.
I really like the end results here.
dUnLb56.jpg
4T5KWIs.jpg

Youtube link:
 
Awesomeness , Q

Great seeing all this again - I was just thinking about the off-gassing from overheating this stuff ,, like 2 days ago ,, for some reason .
I was digging ice cubes out of the ice-bin in the freezer LOL . Weird what we remember .
 
Thanks.
Got some more work I'm doing on the bracers that I'll be showing soon enough
 
Okay, may have gone a little crazy here.
Going to Star Wars Celebration over Memorial Day weekend.
Masks will be required.
Mandalorian can wear normal mask under helmet, no problem
Jedi can wear normal mask, no problem
A Sith would not wear a normal mask.
So, to remedy this, yesterday, I took some templates from Much Props and started a 'rebreather' style mask.
It's a little rough, I'll admit, but it got finished in two days so I can take it with me to Anaheim.
Video does a better job of explaining what I actually did with the mask.
 

Attachments

  • 20220521_133650.jpg
    20220521_133650.jpg
    221.4 KB · Views: 1
  • 20220521_144751.jpg
    20220521_144751.jpg
    267.4 KB · Views: 1
  • 20220521_175331.jpg
    20220521_175331.jpg
    189.3 KB · Views: 1
  • 20220521_175338.jpg
    20220521_175338.jpg
    199.6 KB · Views: 1
  • 20220522_131845.jpg
    20220522_131845.jpg
    385.1 KB · Views: 1
  • 20220522_134953.jpg
    20220522_134953.jpg
    416 KB · Views: 1
  • 20220522_142025.jpg
    20220522_142025.jpg
    391.9 KB · Views: 2
  • 20220522_142029.jpg
    20220522_142029.jpg
    300.5 KB · Views: 2
  • 20220522_142034.jpg
    20220522_142034.jpg
    281.9 KB · Views: 2
y9biijT.jpg


That's cool , man .
Especially for a speed build .
Have a great time at the event !
Anaheim , California ?
 
Thanks, guys.
Been waiting for almost a year and a half for this.
It was originally supposed to go off in August 2020, but, like a lot of things, got postponed.

Be in the Mouse's neighborhood for sure. The convention center looks to be right outside Disneyland proper
 

Latest posts

Back
Top