Chris S
Its a bit like being handcuffed to a lunatic !
- Joined
- Feb 14, 2011
- Messages
- 4,573
Hi folks,
As part of my ongoing Marder III build Im putting together a small Diorama for it .Part of the backdrop of the dio is going to be an old rotten broken slat fence. So I thought Id take a little time to show my proccess of creating such a fence .
Im sure a lot of you know this stuff ,but there maybe some people new to the game ,or simply havent tried this sort of thing yet ,so hopefully someone will get something out of this .
Obviously you will need to consider the size and type of fence you want in your dio ,but you will need to decide on that yourself as to what suits ,but the construction will probably be very similar .
So ,To start off this is my basic materials .......

In the foreground of the above pic is a bunch of coffee stirrers....very handy") they will make up my slats ,behind those are the posts and the runners already cut to length.
they will make up my slats ,behind those are the posts and the runners already cut to length.
To do my cutting Im using a simple chopping blade ,but you can also use a modelling knife or similar.

Once I have the components cut ,its time to start construction.In order to keep everything square Im using a cutting mat with a grid printed on it .I set out the two runners and temporarily fixed them down with a bit of Blu tack or plasticine.

Then its time to start laying the slats .Again Im using the grid to line these up .The top edge and one side being lined up .I also wanted a slight gap between the slats ,so to get these all the same I used one slat on its edge as a spacer.

Using a spot of super glue on the runners makes it really quick to assemble a panel. You will notice I left a few slats out this is because I want to add some broken parts
Once all the slats are in place the fence can be turned over and the posts fitted ,remember to keep a bit of length on the bottom so they can be fixed into the ground

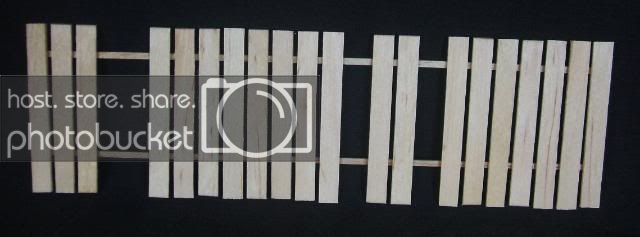
To do the broken slats simply break a few pieces and glue in place ...

And here I have my basic fence .

All of this only took an hour to do ,and some of that time was for taking the pics .
In the next part I will show how I distress the wood a bit more ,add the nail detail ,then paint & weather .
Thanks for looking ,please feel free to ask any questions
Chris.
As part of my ongoing Marder III build Im putting together a small Diorama for it .Part of the backdrop of the dio is going to be an old rotten broken slat fence. So I thought Id take a little time to show my proccess of creating such a fence .
Im sure a lot of you know this stuff ,but there maybe some people new to the game ,or simply havent tried this sort of thing yet ,so hopefully someone will get something out of this .
Obviously you will need to consider the size and type of fence you want in your dio ,but you will need to decide on that yourself as to what suits ,but the construction will probably be very similar .
So ,To start off this is my basic materials .......
In the foreground of the above pic is a bunch of coffee stirrers....very handy
they will make up my slats ,behind those are the posts and the runners already cut to length.To do my cutting Im using a simple chopping blade ,but you can also use a modelling knife or similar.
Once I have the components cut ,its time to start construction.In order to keep everything square Im using a cutting mat with a grid printed on it .I set out the two runners and temporarily fixed them down with a bit of Blu tack or plasticine.
Then its time to start laying the slats .Again Im using the grid to line these up .The top edge and one side being lined up .I also wanted a slight gap between the slats ,so to get these all the same I used one slat on its edge as a spacer.
Using a spot of super glue on the runners makes it really quick to assemble a panel. You will notice I left a few slats out this is because I want to add some broken parts
Once all the slats are in place the fence can be turned over and the posts fitted ,remember to keep a bit of length on the bottom so they can be fixed into the ground
To do the broken slats simply break a few pieces and glue in place ...
And here I have my basic fence .
All of this only took an hour to do ,and some of that time was for taking the pics .
In the next part I will show how I distress the wood a bit more ,add the nail detail ,then paint & weather .
Thanks for looking ,please feel free to ask any questions
Chris.


