M60A1 build

Docbritofmf

Active Member
Joined
Jun 10, 2021
Messages
266
Another build to keep me busy, I had my eye on this kit the last time I was in the shop but didn't have enough cash on hand.
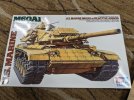
PXL_20221012_030142603.jpg
I have seen reactive armor in person but even though I believed this tank still existed in some areas of the military when I served in Iraq I don't believe I ever saw one though all tanks look similar in sand yellow.

I started building the hull but I didn't take any pictures yet. If it's any thing like the chieftain the hull and all of its suspension components and road wheels are gonna be very time consuming.
 
I look forward to seeing the paint and weathering progress of this project . put some good music or podcast on during the wheels/ gear .
 
PXL_20221012_180254605.MP.jpg
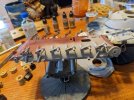
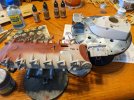
So I got most of the hull suspension components assembled, and I filled a small seam like but it's gonna need a little more work, I used Mr Surface level 500 thinned with Mr leveling thinner to prime the hull, I saw this combination used on YouTube and it works well to hide any blemishes or glue marks and uneven sanding. I saw it recommended that for smaller seam lines you can take the MR surfacer and paint it on by brush and this will fill the line when it dries you can sand it and the seam line will remain filled.
PXL_20221012_180306794.jpg
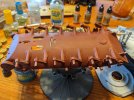
After the surfacer primer I sprayed Vallejo Red Brown primer this came with a weathering kit and although this build isn't gonna be really rusty in the end I am gonna chip it up so this color will make a good under coat, the step could have been skipped or another color used since Desert yellow is the end color of the build but it sprayed on nice and clean and helped to significantly cover blemishes but not hide detail and surprisingly since I wasn't able to figure out what is a good thinner for the Vallejo primer since alcohol, paint thinner and leveling thinner all seemed not to combined well I just sprayed it with out thinning and at about 20 psi a small amount covered alot compared to some Tamiya paints I thin and spray.
 
" I wasn't able to figure out what is a good thinner for the Vallejo primer since alcohol, paint thinner and leveling thinner all seemed not to combined well "

Paint thinner / mineral spirits isn't for water base acrylic paint . Ever .
As you know from the other thread not all acrylics are compatible with all solvents .
The best thing for Vallejo is their own AB thinner , which I use a lot in other paints .
It contains no alcohols . Water and propylene glycol with a small amount of ammonia as a surfactant . Completely non-toxic .

Golden's AB medium works well too and is a very similar formulation
I'm aware paint thinner and mineral spirits aren't for acrylic, but Tamiya paints acrylic and you can thin it with alcohol, and for some reason Mr Leveling thinner which from what I found is a Laquer thinner, as well as water. Vallejo is acrylic and doesn't thin with alcohol which is different so I figured the hell with it try other things to see which one fit.. over all water was the only thing that worked my question is what the heck is Vallejo acrylic that it requires its own special purpose thinner.. being that I didn't know vallejo was special I figured I'd try to find out what I could and couldn't use an as of now I don't have Vallejo thinner so water is and was the only option.

Even harder to solve was their chipping fluid again alcohol was not a solution, but I figured alcohol may work cause it thins but then evaps leaving just the original solution which works in hair spray but again not in the Vallejo chipper which evidently isn't formulated like hairspray
 
Updates, so I still haven't had to much success with the vellejo paint, I tried mixing it separate with the thinner and another with distilled water how ever I still got varied success as far as flow and coverage and gave up with it for now maybe if it was the model air version it would work better but for now Tamiya is doing the job with much better success.

PXL_20221013_170917087.jpg
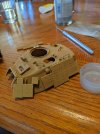
The kit had one major seam line so far that needed to be filled, I know it's sloppy but itll sand and look alot better in the end and then I'll coat it with Mr Surfacer 500 and sand it again before painting it.

PXL_20221014_195531808.jpg
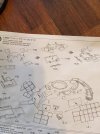
I also started assembling the turret which I guess is from a previous version of the kit because the armor plating pieces are an add on in the real life version of the tank during it's Desert Storm deployment. Tamiya must have taken the original m60A1 kit and then added stuff to it because the instructions call for drilling several holes into the turret to hang the armor plates, these hole were very hard to locate with barely existent marks on the plastic for reference.

The one good thing Tamiya did was mark there individual pieces with numbers and letters to help the builder assemble them in sub assemblies before mounting which made this process fun and not to difficult.PXL_20221014_195539594.jpgPXL_20221014_195535945.MP.jpg

I made a lot of progress today in assembly with a few small challenges, the most significant being a very delicate and flimsy basket structure that I broke into like 15 pieces and will probably have to build from scratch with thin wire.

I am also waiting on a turned brass barrel upgrade I ordered that's coming from California l.
 
Updates, so I still haven't had to much success with the vellejo paint, I tried mixing it separate with the thinner and another with distilled water how ever I still got varied success as far as flow and coverage and gave up with it for now maybe if it was the model air version it would work better but for now Tamiya is doing the job with much better success.

View attachment 94319
The kit had one major seam line so far that needed to be filled, I know it's sloppy but itll sand and look alot better in the end and then I'll coat it with Mr Surfacer 500 and sand it again before painting it.

View attachment 94320
I also started assembling the turret which I guess is from a previous version of the kit because the armor plating pieces are an add on in the real life version of the tank during it's Desert Storm deployment. Tamiya must have taken the original m60A1 kit and then added stuff to it because the instructions call for drilling several holes into the turret to hang the armor plates, these hole were very hard to locate with barely existent marks on the plastic for reference.

The one good thing Tamiya did was mark there individual pieces with numbers and letters to help the builder assemble them in sub assemblies before mounting which made this process fun and not to difficult.View attachment 94321View attachment 94322

I made a lot of progress today in assembly with a few small challenges, the most significant being a very delicate and flimsy basket structure that I broke into like 15 pieces and will probably have to build from scratch with thin wire.

I am also waiting on a turned brass barrel upgrade I ordered that's coming from California l.
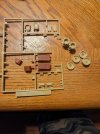
One thing I forgot to mention the kit seems to have about a dozen extra parts mostly road wheels and I don't know the term but those big gear looking wheels
 
Are they identical to the other ones ?
I don't know this tank but I'm guessing it's for a variant if they are different .
 
Looks like the drive sprockets stayed the same but early models had aluminum road wheels and then they switched to steel wheels .
I guess Tamiya molded the road wheels and sprockets as sets , so there is a twin set of sprockets .

The other road wheels are different , yeah ?

Drawings at the bottom of the page showing the difference in appearance between the aluminum and steel road wheels :
https://tanks-encyclopedia.com/coldwar/us/m60_patton.php
Yes it does have different what I assume are road wheels they are larger then the road wheels I have on it but there are only three of them and two extra sprockets
 
They are larger ?
Post a pic of what you have .

In that link above , under " DRIVETRAIN " it says , " the roadwheels were cast in aluminum, and not in steel, a weight-saving measure. However, this made them slightly more fragile, and costlier, so spare steel roadwheels were kept. "

I interpret that to mean they carry spare roadwheels that are steel but it's hard to find any tanks carrying spares at all .
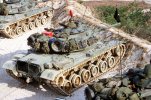
There is this one , but those appear to be the same aluminum wheels :

-tracked-vehicle-battalion-participate-0bbebc-1024.jpg
 
PXL_20221015_142622148.jpg
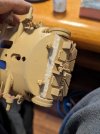
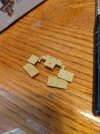
So far these are the parts I have checked threw an can not find a home for on the build, I believe some road wheels maybe spare ones I can mount onto the model as if the crew were carrying spares with them.
 
As I would expect ,
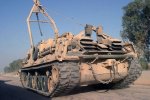
the only place I've found spare sprockets , and it's only the sprocket not the hub , is on M88 recovery vehicles .
Pretty sure you'd need that thing to replace a damaged sprocket anyways . .. but I wasn't a tanker .

1024px-M88A1_during_Operation_Iraqi_Freedom.jpg
 

Latest posts

Back
Top