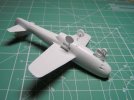
Lavochkin La-174TK

f2k

New Member
Joined
Apr 2, 2011
Messages
301
It's been nearly a month since I moved and I'm almost settled in so I suppose I better get building.

entry_001.jpg


This then, is a Lavochkin La-174TK. And no, I don't know what that is either...

From what little information I have been able to find, this is an experimental variation of the Lavochkin 156 which was itself a prototype version of the Lavochkin 152, equipped with a more powerful engine than the standard 152.

Good enough to qualify for the prototype catagory, I trust... ;D

What was special about the 174TK was its wings. Straight and very thin, it's believed (acording to Wikipedia, anyway) that it was the thinnest wings yet flown at that time.

Taking to the air in early 1948, it reached at top speed of almost 1000 km/h at sea level and could climb to an altitude of 5000 meters in only two and a half minute.
Sounds impressive, but the swept-wing La-160 had been flying for nine months by then and was showing even better results so the program was canceled.

Eventually, the Yak-23 was chosen for production and this series of aircraft seems to have slipped into obscurity.


How did I end up with the model in my collection then?

Well, pretty simple really. One day I was trawling eBay for deals and this showed up in the "You might like..." section. I thought it looked interesting so I bought it without actually knowing much about it.


The kit itself is exceedingly simply with just 39 parts, a decal sheet, and a single sheet of paper with very basic instructions and a single paint-scheme.

sprue_001.jpg


Not much else to say about it right now. According to the only build-log I can find with this particular model it's a bit of a trial to put together. But I'll find out myself, I suppose.

I'm planing to rig up my airbrush tomorrow and then I'll get working on the cockpit. It's build as a tub that's inserted into the aircraft so I'll need to get it painted before gluing it together.


Truth to be told, I'm just going to wing this one. Aha ha ha ha...

Sorry, pad pun... :p

But honestly, I don't yet know quite where I'm going with this. The build itself looks pretty straight forward and the paint-scheme (grey, grey, and yet more grey) isn't exactly inspiring.

If only the kit had included a pilot I might have been able to do something interesting. But sadly it seems that pilots are in short supply in most kits. And modeling it in an "at easy" pose on the ground doesn't quite work either as the canopy is a one-piece affair with very shallow details that does not allow modelling the plane with open cockpit.
 
Amazing stats for aircraft in that period. Does the rear landing gear fold to the rear? Hidden?
 
Timbaux said:
Amazing stats for aircraft in that period. Does the rear landing gear fold to the rear? Hidden?

Oh yes. It was a pretty good aircraft. But, quite simply, it was overtaken by swept-wing designs as they were far more efficient when nearing mach 1.

As for the rear doors, they are a bit special.

1-72-lavochkin-la-174tk.jpg

As you can see here, they're tucked into the fuselage near the exhaust. As far as I understand it, they retract straight up and into the fuselage
 
No, I haven't forgotten about this. Just haven't had the time and energy...

Now that I've got my airbrush ready I finally decided that I had to get working on this kit again. So I began dry-fitting the components for the engine and the cockpit.

Sigh...

ARGHHHHHHHH!!!!!!

When I say dry-fit, I mean "fit" in the loosest term possible. As in: nothings fits - AT ALL!

My original plan was to paint the parts of the cockpit separately, drop it into the fuselage, and then use masking take to cover it as I worked on the rest of the model. But that plan is now thrown out the window.

I can foresee some major sanding, cutting, and greenstuffing coming up. So basically I have to fit everything into the fuselage as best I can and then smooth out all the gaps and other irregularities that will result. Only once that's been done can I start painting it. Which means that I'll have to paint it all through the tiny holes in the fuselage. Which I'm not looking forward to... :(

assembly_001.jpg


As can be seen in the instructions, everything is supposed to just drop straight into the fuselage. But...

Well, the good news is that the cockpit assembly fits with only a few gaps around the edges. The bad news is that the pilot's seat is a good two millimeters too wide and simply won't fit into the cockpit. I'll probably end up having to sand off a good millimeter on each side, completely removing the sides of the seat itself in the process, fit it into the cockpit, and then use greenstuff to build the sides up again.

The engine exhaust just lies there with nothing to hold it in place and nothing to show where it's supposed to fit. And either it will sit a good three or four millimeters inside the fuselage (which can't be good for the airframe in the long run I'd imagine - heat and all that...) or I'll have to do some serious sanding in order to make room for it as the edge of the fuselage around the exhaust is way too thick to allow it to be mounted there.

And speaking of sanding, the intake assembly will need a good two millimeters removed if the fuselage is to fit over it. Right now the two halves of the fuselage simply will not meet around the intake.

Yeah, it's pretty bad.

Straight out of the box, he said...

Sigh...

As forewarned by that other blog, the fit really is pretty bad. I don't know if this is a general issue with that particular company or if it's just this model.

One thing's for sure though. Assembling this model "straight out of the box" is anything but straight...
 
Sadly, I must report that I've now started to absolutely hate this kit!

I was really looking forward to building this plane, but so far it's been fighting me all the way. Not at all the easy straight-out-of-box build that I had hoped it would be.


Right, so last time I worked on this I was grumbling about the seat being too wide for the cockpit. Well, I can now report that this isn't the only issue - the instrument panel was too wide too.

So, reluctantly accepting that I must have assembled it wrong (easy to do given the very basic instructions and the complete lack of guide-tabs) so I had to carefully cut the side off and fit the seat and instrument panel before reassembling it again.

This, it must be said, required some major surgery on the instrument panel and, in particular, on the hood that's supposed to fit over it. If mounted as it is, it's not possible to mount the windscreen later. Instead, the panel itself must be reduced slightly in height, to fit better within the cockpit, and the hood had to have several millimeters shaved off all round so as to leave room for the windscreen.

Sadly, by then I had already greenstuffed (or greystuffed in this case) the inside of the fuselage, including using it to fix the cockpit in place.

You see, with no guides I simply could not get things to fit as supposed within the fuselage. The intake and cockpit had a few guides, so here the greystuff was more a case of helping it to stay in place while the glue dried.

The wheel well and exhaust, on the other hand, had absolutely nothing to keep them in place so I had to use blobs of greystuff to "glue" them in place. The exhaust, in particular, is really problematic. It simply will not fit within the fuselage if pushed all the way to the edge and if left sitting further in (as I did) it will not line up properly, due to the cockpit, and won't line up perfectly with the fuselage.

Well, once the plane is standing on all three wheels this won't really be that noticable, so meeehhh...

assembly_002.jpg


The use of greystuff has had one unexpected benefit though. A bit later in the instructions there's a weight icon superimposed on the nose of the plane. It would seem to indicate that the nose must be weighted down, but just how much weight is needed is an open question. It's not mentioned - at least, not in a language I understand.

Do note that the wheel well isn't actually supposed to be mounted at this point. Rather, it's supposed to be mounted from underneath after the two halves of the fuselage have been glued together. But with no guides or stops to help keep in it place, I decided that was just not feasible and instead mounted it now.
In any case, as the wheel well was a good three to four millimeters too wide for the hole in the fuselage, it was easier to gut and sand the fuselage now, rather than later when it was already glued together.


With all of this done, I started assembling the fuselage. Frustratingly, now that the cockpit has widened a couple of millimeters, the fuselage doesn't quite fit anymore.

So I've glued the front, as best I could, and secured it with rubber bands. Hopefully, as the glue cures overnight, it will bind the front so strongly together that tomorrow I can glue the rear together. Fingers crossed then, that the glue will hold under pressure...

assembly_003.jpg


Once the entire fuselage is glued, then it's time to break out the brownstuff and fill in all the gaps between the two halves before sanding it all smooth. But I'll tackle that issues when I get there...
 
You can make this fly.
I know it's looking rough right now, but there's a finish in sight
 
Thanks... :D

I have to say that right now, this project is operating on sheer bloody-minded stubbornness as far as I'm concerned.

It's not that I mind a challenging and difficult build, it's just that this kit is so low-quality that it becomes frustrating.

If it hadn't been part of the competition, I think it would have been one of those kits that could spend years in a box, getting brought out in the daylight every now and again to have another piece fitted, and then put aside again.


Anyway, the good news this morning is that the glue seems to be holding, though barely. Cracks have opened up along the seam but hopefully I can brownstuff those. I took a few minutes to glue the rear end of the fuselage and secure it with rubber bands. I guess I'll see how it goes tonight.
 

Latest posts

Back
Top