Hey guys!!! After all the excitement from my recent build of the 1/32 Japanese zero, i'm ready to start building a few other models before the next IPMS competition, so far I have an unfinished P-51 in a 1/48 by tamiya, that model is mostly paint work, but the other model I wanted to build was the USS Independence LCS-2.
About a year ago I had seen this kit before all built and well painted, but now I wanted to build my own version of this model with plenty of extra details and paint work.


Kit content are fairly small
FLIGHT DECK:
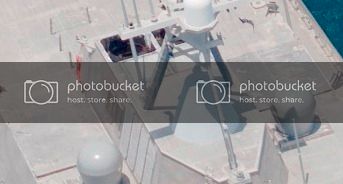
For the flight deck there is plenty to detail. The most major detail that is not molded into this kit are the anchor points for the helicopters. There are, roaming around the internet, a photoetch set which includes the newly improved flight deck, however i love scratch building, so a large portion of this build will have scratch built details. Here is a reference photo I'll be using for my flight deck references.

I started by finding a reference top view with all the anchor points and sized it to the scale of the model. I cut out the flight deck and taped it on centered as could be. Next I took a #76 drill bit and drilled each whole individually (note i did not drill all the way through the plastic)


1 hour later, i got my first result!!! I am planning to widen each anchor point a little more and try to add the cross joint details to each one. So far I am going to try an idea I have to do this.

About a year ago I had seen this kit before all built and well painted, but now I wanted to build my own version of this model with plenty of extra details and paint work.
Kit content are fairly small
FLIGHT DECK:
For the flight deck there is plenty to detail. The most major detail that is not molded into this kit are the anchor points for the helicopters. There are, roaming around the internet, a photoetch set which includes the newly improved flight deck, however i love scratch building, so a large portion of this build will have scratch built details. Here is a reference photo I'll be using for my flight deck references.
I started by finding a reference top view with all the anchor points and sized it to the scale of the model. I cut out the flight deck and taped it on centered as could be. Next I took a #76 drill bit and drilled each whole individually (note i did not drill all the way through the plastic)
1 hour later, i got my first result!!! I am planning to widen each anchor point a little more and try to add the cross joint details to each one. So far I am going to try an idea I have to do this.


 I used the same method I did with the anchor points on the flight deck.


