Charger Funny Car

Elm City Hobbies

Active Member
Joined
May 7, 2009
Messages
3,239
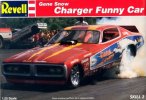
Started on this one yesterday

RMX-7619-2.jpg

For a build with the CAMS club here called Fall Funnies.

I won't be doing it as seen on the box, the plan is to make it into a promo piece for the shop, so it will be the ECH Funny Car, possibly with secondary sponsorship from Tim Hortons and maybe the Mtl Canadians! LOL Should be a hoot!

So far I just have the frame cut off the trees, mold lines cleaned up (as there were many with this old kit), lots of flash to clean, and knockout marks puttied, so not much to see.
 
OK, busy week here at the shop with orders coming in, and orders going out, getting the website updated, etc, etc, etc.

As a result, not alot of time to work on this, but did get some work done on it today.

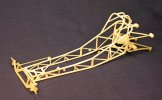
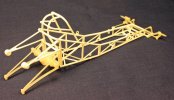
Frame is assembled, and getting some of the extraneous pieces installed into the frame so I can get as much painted as I can without having to do a bunch of small pieces.

Not sure if they are coming up in the photos, but you may be able to see a couple of different types of plastic. The regular white styrene, and some translucent styrene. The translucent stuff is actually the styrene that was under the chrome plating on the chrome tree. Despite having a bunch of chrome parts to "bling" out your dragster with, it isn't very realistic that you would see a race car like this with much if any chrome on it, as chrome is of course a plating process, which would add more weight to the parts, and excess weight in drag racing is bad.

So..all the chrome parts went for a swim in the ultra-sonic cleaner with some Windex. I was quite surprised that one 8 min. cycle took about 95% of the chrome plating off of the parts, and what I was left with was this translucent ghostly white styrene. Almost reminds me of some of the parts that are coming off of the 3D printers these days. Either way, the chrome is gone, and I can get going on the rest of the build.

Now that I have written a book, lets have a look at some of the work I have done up to this point.

Couple of frame shots

IMG_4174-vi.jpg

IMG_4175-vi.jpg

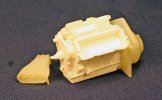
And the engine built up as far as I can take it before paint

IMG_4176-vi.jpg

When I built the blower intake, the butterflies flipped to the open position on their own, thought it looked pretty cool so I left them.

Next up, finish up what I can install on the frame and get some primer on everything!
 
Very Cool Scott doing all them decals will be fun ;D
 
Actually I am doing custom decals for this. Going to be a little promo piece for the shop, just trying to work out a color scheme, and find my blank decal sheet!
 
Yeah, they is what I was thinking was Blue & White. Have an idea how to lay it out, and trying to decide on a blue, but leaning towards the Vallejo Air Arctic Blue Metallic.

I had used Squadron Green Putty on the knock out marks inside the body (all 12 of them, and half the diameter of a dime and about 1/16-1/32 deep), that the green putty would show through, but the plastic is opaque enough itself that you can't see the green, so should be no problem.

I will likely "borrow" some SMA and SMA Mag. logos for it as well if that is OK by you.

Thinking maybe Tim Hortons on there somewhere as well, maybe a couple of other smaller recognizable contingency markings as well.
 
Nice. Yeah Vallejo Air Arctic Blue Metallic is a nice choice. No worries on the logos. Grab em.
 
Cool project Scott :) Why dont you do a complete decal wrap on the car ? if you're printing your own ,you could put a nice fade in it too like your banner ,you just need to paint the shell white then :) ...just a thought .

Chris.
 
Chris S said:
Cool project Scott :) Why dont you do a complete decal wrap on the car ? if you're printing your own ,you could put a nice fade in it too like your banner ,you just need to paint the shell white then :) ...just a thought .

Chris.

I was thinking the same thing.....
 

Latest posts

Back
Top