Albatros DII (Encore Models 1:32)

JMac

cut. glue. paint. repeat.
Joined
May 24, 2009
Messages
2,812
Now that the Skyrocket and the BF-109 T2 are done I thought I would start another couple threads. My goal for the next little while is to continue to finish up some shelf queens. Unfortunately my BSC 2012 builds have fallen into that less than desirable catagory. ??? This was supposed to be my first of three BSC builds (the other was B-17, and the last which I did not even start was a Gotha bomber).

This build ran aground with the engine and some assembly instructions/mistakes. At that point I was frustrated with this build and enjoying building other stuff. So rather than rush it, I'm going to finish up the Albatros here.

I've a few WiP pictures I'll post them with some back history to the build over the next few days. Can't do it tonight due to other family stuff on the go.

Jason
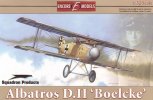
ec32001reviewrb_1.jpg
 
Albatros D series fighters are one of my all time favourite airplanes.

The Encore kits are nice. Really just a re-box of a Roden kit (a manufacturer I like very much) and then they (Squadron brand I think) includes some addition resin and PE stuff. Good price considering everything in the box. Ironically - I bought the kit mainly for the resin engine and there is where the trouble started.

I'd love to pick up some Wingnut Wings kits. They look to be incredible, the WNW stuff is expensive here in Canada, and I have a ton of other projects to finish first. This buy and not building has got to end...

Your friends WNW build is wicked (i just took a look at it). As a cool side note WNW is a sister company to a firm that builds super cool replica bi-planes.

http://thevintageaviator.co.nz/

Jason
 
Thanks for that Jason ,yeah it is Squadron that rebrands them .Think I might look into them :)

Going for a nosey at that site now :)

Chris.
 
Cool. :) Very glad you guys are interested and following along. :)

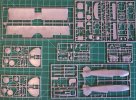
The kit is based on a Roden Albatros kit. Here's a picture of the sprues that come in the box.
3201a.jpg
My kit had almost no flash, some of the parts (mainly the fuselage sides) had ejector pin marks that I filled in with Mr Dissolved Putty.

Also included in the box;

A small PE set; includes belts, instrument faces, machine gun jackets and covers, latches and the like.
A resin engine.

Here's a review of the kit;
http://modelingmadness.com/review/w1/previews/3201.htm

Here's the back history of my build.

I started my build with painting the interior parts after filling and sanding the ejector pin marks inside the fuselage. After priming with Vallejo 73-601 Primer, I pre shaded and painted the base coat Vallejo Model colour Desert Yellow. Once that had dried, I began the wood grain effect by applying (with torn pieces of a sponge and a brush) a mix of raw umber, burnt sienna and black oil paints.

More updates in a second...


[attachment deleted by admin]
 
The main problem I had to date was with the resin engine. It's really a fantastically detailed addition to the model. But mine arrived with the mounting lugs (tabs) on the main case broke right off. These features are really very fragile. After attempting to put the original resin parts back together (I would have had more success with Humpty Dumpty), I ordered a second resin engine from Squadron. Same problems with the replacement, the lugs were either broken, or could not tolerate general handling from my gorilla thumbs.

At that point I decided to cut the bottom off the PS kit engine and replace the cylinders with the resin parts. I don't have many pictures of that, but I'll post more as I paint and assemble the engine.

Also my the top wings of my kit were damaged and had to be repaired (see picture #4 of my last post - sorry). The damaged areas were filled in with sheet and putty ( yellow arrows picture 5). PE covers were then added to the wings (blue arrows picture 5).

Finally the remaining pictures show my progress in modelling the rib tapes. 1/32" wide pieces of tape marked the rice tape location. I masked on either side, then removed the 1/32" piece and filled the centre with Mr. Surfacer 2000.

More to come. Comments, thoughts, and suggestions welcome.

Thanks for looking.
Jason

[attachment deleted by admin]
 
Great start Jason ,I like the wood colour ...very nice . Thats a good idea for the rib tapes ,looks effective . Keep it coming :)

Chris.
 
Nice trick with the rib tapes. I'm guessing you hand brushed the Mr.500 because you couldn't have AB it on....too thick, and would solidify in the channel and the tip. If memory serves me correct that was an old trick Sci Fi movie modelers used to create panel lines on ships. They would draw on the model where they wanted panel lines then cut thin strips of tape and placed them over the lines. When they were finished they would spray several coats of primer then lift the tape revealing perfect panel lines every time. Very kinky indeed!
 
Thanks for the encouragement guys. :)

@Glorfindel - I did not know the Sci-fi panel line trick. Cool. I've added that one to my modelling notebook.
For the rib tapes - I'd seen some WW1 plane builds online where the rib tape was done the same way I did it. I did hand brush the Mr. Surfacer.

I'm chipping away on this one. It's going to take awhile. Wings are now primed light grey.

The first picture is of the resin parts that make up the engine, the crank-case on the right was the one that originally came in the kit. Almost all of the mounting tabs (lugs) were broken off. The case on the left was the second one that I ordered (and then repaired 3 or four times). After that I decided I would make the engine out of a combination of the plastic and resin parts. I'm currently assembling and painting the engine, The lower image in the second picture was my test fit just prior to gluing the cylinders to the case (from about a month ago).

I've also been working on the cockpit painting and PE. Still a ton of assembly in that area to do before I can close up the fuselage.

Jason

[attachment deleted by admin]
 
Nice ....Very nice ;D Love the interior wood ,looks fantastic . That engine looks sweet ,pity about the lugs but you seem to have it sorted , coming on great ;)

Chris.
 
Wow those belts sitting in the seat like that look as if there truly about to flap around. Man that is some great work.
 
Thanks guys. :)

Haven't had much progress this week, I'm trying to get everything I need to wrapped up at work before I head off to my summer holidays next week. I'll have some solid modelling time this week end.

Jason
 
Well summers in full effect here, it's been relatively hot for the area (we've had nearly a full week of 30 degree C weather). Another sign that it's summer is my rapidly ballooning "honey-do" list.

For both reasons not a lot of progress here. I did manage to get the engine basically fully assembled and the base painting done on it. It still needs some touch ups and weathering...don't think I'll go too crazy on painting it - mainly it's going to be pretty much buried in the fuselage.

I'll get started on the rest of the cockpit details next - just figured out that I missed painting a bunch of the internal wood grained surfaces...

Jason

[attachment deleted by admin]
 
Thanks a lot Grendels, Scott and Chris. :)

I think I had a very productive day working on the Albatros. Finished up the PE and the painting on the engine, got the cockpit painting/construction about 75% done. Joined the engine assembly to the formers/engine mount. And test fit the lot. Already found some spots that may cause some grief when I actually button up the whole fuselage. In the pictures below the engine mount is not glued in place yet, it's just positioned for the test fit.

Thanks for looking and following along.

Jason

[attachment deleted by admin]
 

Latest posts

Back
Top