Carsenault
New Member
- Joined
- May 7, 2009
- Messages
- 845
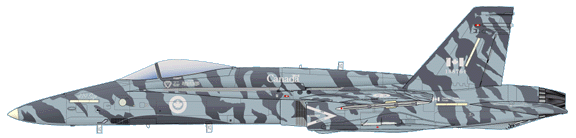
Hi All, back at it. I decided to go back to my comfort zone for a bit and build an F/A-18 Hornet, I have built a number of these over the years in several scales, all but one of them were done in Canadian Markings and this one is no exception. the kit is the Hasegawa 1/48 F/A-18C which I will backdate to a CF-188A . This will be my 4th Hasy 1/48 Hornet, very familiar with it so its almost like visitng an old friend.
What Id like to do whith this WIP is highlight all the trouble spots and share a few pointers on how to make a Canadian Hornet.
This kit have been around now for 20 years but in my opinion is still the best 1/48 Hornet kit on the market, and the second best overall after the 1/32 Academy F/A-18 family when you include the other scales. The kit is quite well detailed but not over engineered. It has about 225 parts molded in grey and clear styrene, sturdy white metal landing gear and a small fret of photoetched parts. The panel lines are finely recessed as is the rivet detail. All control surfaces are positionable, and the usual optional position canopy and landing gear. Like most Hasegawa modern jets, no weopons are included, only stores are external tanks and various targeting pods. This is by no means a shake and bake kit, with some careful building, this can be made into an exceptional model in the right hands.
Going over a few of the parts, Ill show you the tails first, On the left are the tails from this kit, on the right is the tails from an F/A-18B variant, notice the diffrerent arangement of the sensors on the upper tail. While not exactly the same, they are close enough to pass for one another if you remove the second sensor frm the top on the F/A-18C tails. Before I do that, I will check my spares box in case I saved the tails from the USN F/A-18A I had to scrap after a "Class A" moving mishap last year.

Another thing to watch out for is if you need the ID spotlight or not. Many export Hornets have a spotlight mounted through the ammo loading door on the left side of the nose, as is the case with Canadian Hornets. Thing is, these are often removed and replaced with a grey or tan colored insert, so check your references to see if your particular Hornet had the spotlight or not. Mine doesn't have it and the decal sheet has a decal to represent the grey patch so I didnt have to open up the spotlight hole. If you do need it, there is a flashed over hole visible from the inside of the part, open it up and glue in the clear disk, then once that is dry, attach the clear spotlight housing behind that, then paint it chrome silver from the inside only. Be sure to mask off the clear lens on the outside before painting the fuselage.


The left and right halves of the nose fit together pretty well, a light sanding on the seam is recommended being careful not to sand away the fine recessed panel lines like I almost did... :") Be careful to line everthing up right so the detail at the flat end is preserved, that is the forward blukhead of the nose gear bay.
Be careful to line everthing up right so the detail at the flat end is preserved, that is the forward blukhead of the nose gear bay.


Next I moved to the cockpit, not much done here yet, just a base coat of Vallejo dark sea grey in the tub and instrument panel. As you can see, some of the cockpit parts are shared by both single and dual seat kits. The instrument panel uses an optional photo etch part to represent the fuel guages. its at the bottom left of the panel. The older Hornets uses analog fuel guages, the newer ones have digital guages.


I love how Hasy did the upper fuselage, the upper wings are molded in place so no highly noticeable ugly seams to fill. In fact, many of the seams fall on natural panel lines so if you are carefull building, not much filling will be required. The extra large cockpit opening will alllow both single and dual seat arangements depending on which kit you have. A few parts are placed into or over the opening for whichever variant you're building. The fit here is not as nice as it could be, a little sanding will fix that.


What Id like to do whith this WIP is highlight all the trouble spots and share a few pointers on how to make a Canadian Hornet.
This kit have been around now for 20 years but in my opinion is still the best 1/48 Hornet kit on the market, and the second best overall after the 1/32 Academy F/A-18 family when you include the other scales. The kit is quite well detailed but not over engineered. It has about 225 parts molded in grey and clear styrene, sturdy white metal landing gear and a small fret of photoetched parts. The panel lines are finely recessed as is the rivet detail. All control surfaces are positionable, and the usual optional position canopy and landing gear. Like most Hasegawa modern jets, no weopons are included, only stores are external tanks and various targeting pods. This is by no means a shake and bake kit, with some careful building, this can be made into an exceptional model in the right hands.
Going over a few of the parts, Ill show you the tails first, On the left are the tails from this kit, on the right is the tails from an F/A-18B variant, notice the diffrerent arangement of the sensors on the upper tail. While not exactly the same, they are close enough to pass for one another if you remove the second sensor frm the top on the F/A-18C tails. Before I do that, I will check my spares box in case I saved the tails from the USN F/A-18A I had to scrap after a "Class A" moving mishap last year.
Another thing to watch out for is if you need the ID spotlight or not. Many export Hornets have a spotlight mounted through the ammo loading door on the left side of the nose, as is the case with Canadian Hornets. Thing is, these are often removed and replaced with a grey or tan colored insert, so check your references to see if your particular Hornet had the spotlight or not. Mine doesn't have it and the decal sheet has a decal to represent the grey patch so I didnt have to open up the spotlight hole. If you do need it, there is a flashed over hole visible from the inside of the part, open it up and glue in the clear disk, then once that is dry, attach the clear spotlight housing behind that, then paint it chrome silver from the inside only. Be sure to mask off the clear lens on the outside before painting the fuselage.
The left and right halves of the nose fit together pretty well, a light sanding on the seam is recommended being careful not to sand away the fine recessed panel lines like I almost did... :
Be careful to line everthing up right so the detail at the flat end is preserved, that is the forward blukhead of the nose gear bay.Next I moved to the cockpit, not much done here yet, just a base coat of Vallejo dark sea grey in the tub and instrument panel. As you can see, some of the cockpit parts are shared by both single and dual seat kits. The instrument panel uses an optional photo etch part to represent the fuel guages. its at the bottom left of the panel. The older Hornets uses analog fuel guages, the newer ones have digital guages.
I love how Hasy did the upper fuselage, the upper wings are molded in place so no highly noticeable ugly seams to fill. In fact, many of the seams fall on natural panel lines so if you are carefull building, not much filling will be required. The extra large cockpit opening will alllow both single and dual seat arangements depending on which kit you have. A few parts are placed into or over the opening for whichever variant you're building. The fit here is not as nice as it could be, a little sanding will fix that.